Introduction
One of the PowerShell Modules I’ve been working on for the last year is called LabBuilder.The goal of this module is:
To automatically build a multiple machine Hyper-V Lab environment from an XML configuration file and other optional installation scripts.
What this essentially does is allow you to easily build Lab environments using a specification file. All you need to do is provide the Hyper-V environment and the Operating System disk ISO files that will be used to build the lab. This is great for getting a Lab environment spun up for testing or training purposes.
Note: Building a new Lab can take a little while, depending on the number of VM’s in the Lab as well as the number of different Operating Systems used. For example, a Lab with 10 VMs could take an hour or two to spin up, depending on your hardware.
The LabBuilder module comes with a set of sample Labs that you can build “as is” or modify for your own purpose. There are samples for simple one or two machine Labs as well as more complex scenarios such as failover clusters and two tier PKI environments. Plus, if you’re feeling adventurous you can easily create your own LabBuilder configurations from scratch or by modifying an existing LabBuilder configuration.
In this article I’ll show how to use a configuration sample that will build a lab containing the following servers:
- 1 x Windows Server 2016 RTM Domain Controller (with DNS)
- 1 x Windows Server 2016 RTM DHCP Server
- 1 x Windows Server 2016 RTM Certificate Authority Server
- 1 x Windows Server 2016 RTM Edge Node (Routing and Remote Access server)
- 8 x Windows Server 2016 RTM Nano Servers (not yet automatically Domain Joined – but I’m working on it).
This is a great environment for experimenting with both Windows Server 2016 as well as Nano Server.
So, lets get started.
Requirements
To follow along with this guide your Lab host (the machine that will host your Lab) will need to have the following:
Be running Windows Server 2012 R2, Windows Server 2016 or Windows 10
I strongly recommend using Windows 10 Anniversary Edition.
If you are using Windows Server 2012 R2 you will need to install WMF 5.0 or above. Although WMF 4.0 should work, I haven’t tested it.
Have enough RAM, Disk and CPU available for your Lab
Running a lot of VMs at once can be fairly taxing on your hardware. For most Sample Lab I’d recommend at least a quad core CPU, 16 GB RAM and a fast SSD with at least 10 GB per VM free (although for Nano Server VMs only 800MB is required).
The amount of disk used is minimized by using differencing disks, but Labs can still get pretty big.
Hyper-V Enabled
If you’re using Windows 10, see this guide.
If you’re using Windows Server 2012 R2 or Windows Server 2016, you probably already know how to do this, so I won’t cover this here.
Copies of any Windows install media that is used by the Lab
In our case this is just a copy of the Windows Server 2016 Evaluation ISO. You can download this ISO from here for free.
You can use non-evaluation ISOs instead if you have access to them, but at the time of writing this the Windows Server 2016 non-evaluation ISO wasn’t yet available on my MSDN subscription.
An Internet Connection
Most Labs use DSC to configure each VM once it has been provisioned, so the ability to download any required DSC Resources from the PowerShell Gallery is required. Some sample Labs also download MSI packages and other installers that will be deployed to the Lab Virtual Machines during installation – for example RSAT is often installed onto Windows 10 Lab machines automatically.
The Process
Step 1 – Install the Module
The first thing you’ll need to do is install the LabBuilder Module. Execute this PowerShell command at an Administrator PowerShell prompt:
| Install-Module -Name LabBuilder |

Note: If you have an older version of LabBuilder installed, I’d recommend you update it to at least 0.8.3.1081 because this was the version I was using to write this guide.
Step 2 – Create the ISOs and VHDs Folders
Most labs are built using Windows Install media contained in ISO files. These are converted to VHD files that are then used by one or more Labs. We need a location to store these files.
By default all sample Labs expect these folders to be D:\ISOs and D:\VHDs. If you don’t have a D: Drive on your computer, you’ll need to adjust the LabBuilder configuration file in Step 4.
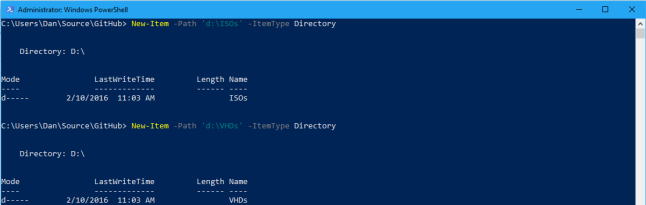
Execute the following PowerShell commands at an Administrator PowerShell prompt:
| New-Item -Path 'd:\ISOs' -ItemType Directory | |
| New-Item -Path 'd:\VHDs' -ItemType Directory |
Step 3 – Create a Folder to Contain the Lab
When building a Lab with LabBuilder it will create all VMs, VHDs and other related files in a single folder.
For all sample LabBuilder configurations, this folder defaults to a folder in C:\vm. For the sample Lab we’re building in this guide it will install the Lab into c:\vm\NANOTEST.COM. This can be changed by editing the configuration in Step 4.
Note: Make sure you have enough space on your chosen drive to store the Lab. 10GB per VM is a good rough guide to the amount of space required (although it usually works out as a lot less because of the use of differencing disks).
Execute the following PowerShell commands at an Administrator PowerShell prompt:
| New-Item -Path 'c:\VM' -ItemType Directory |
Step 4 – Customize the Sample Lab file
We’re going to build the Lab using the sample Lab found in the samples folder in the LabBuilder module folder. The sample we’re using is called Sample_WS2016_NanoDomain.xml. I’d suggest editing this file in an editor like Notepad++.
If you changed the paths in Step 2 or Step 3 then you’ll need to change the paths shown in this screenshot:
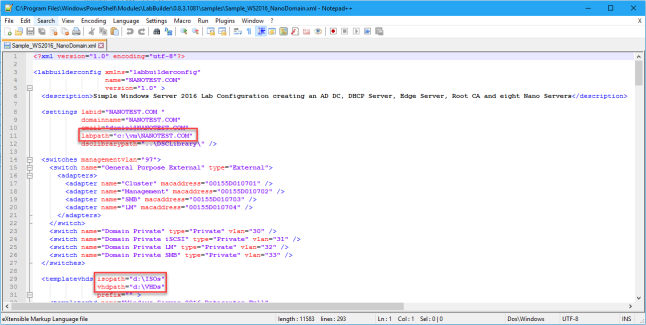
You may also change other items in the Settings section, but be aware that some changes (such as changing the domain name) will also need to be changed elsewhere in the file.
If you already have an External Switch configured in Hyper-V that you’d like to use for this Lab to communicate externally, then you should set the name of the switch here:

If you don’t already have an External Switch defined in Hyper-V then one called General Purpose External will be created for you. It will use the first Network Adapter (physical or team) that is not already assigned to an External Switch. You can control this behavior in the LabBuilder configuration file but it is beyond the scope of this guide.
Save the Sample_WS2016_NanoDomain.xml once you’ve finished changing it.
Step 5 – Copy the Windows Media ISOs
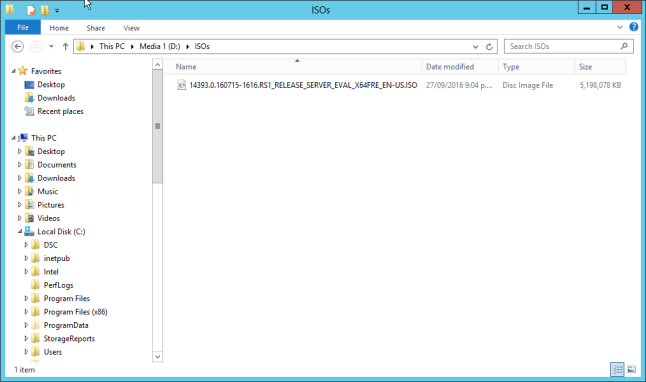
Now that the ISOs folder is ready, you will need to copy the Windows Install media ISO files into it. In this case we need to copy in the ISO for Windows Server 2016 (an evaluation copy can be downloaded from here).
The ISO file must be name:
14393.0.160715-1616.RS1_RELEASE_SERVER_EVAL_X64FRE_EN-US.ISO
If it is named anything else then you will either need to rename it or go back to Step 4 and adjust the sample Lab configuration file.
Step 6 – Build the Lab
We’re now ready to build the lab from the sample configuration.
Execute the following PowerShell commands at an Administrator PowerShell prompt:
| $ConfigPath = Join-Path ` | |
| -Path (Split-Path -Path (Get-Module -Name LabBuilder -ListAvailable).Path -Parent) ` | |
| -ChildPath 'Samples\Sample_WS2016_NanoDomain.xml' | |
| Install-Lab -ConfigPath $ConfigPath -Verbose |
This will begin the task of building out your Lab. The commands just determine the location of your LabBuilder sample file and then call the Install-Lab cmdlet. I could have specified the path to the sample file manually, and you can if you prefer.
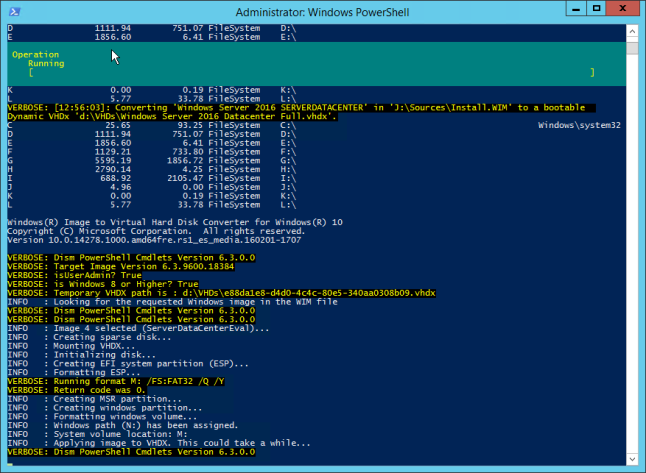
So sit back and grab a tea or coffee (or beer), because this will take a little while.
Note: The individual virtual machines are configured using PowerShell DSC after they are first started up. This means that it might actually take some time for things like domain joins and other post configuration tasks to complete. So if you find a Lab VM hasn’t yet joined the domain, it is most likely that the DSC configuration is still being applied.
Using the Lab
Once you’ve built the Lab, you can log into the VMs like any other Hyper-V VM. Just double click the Virtual Machine and enter your login details:

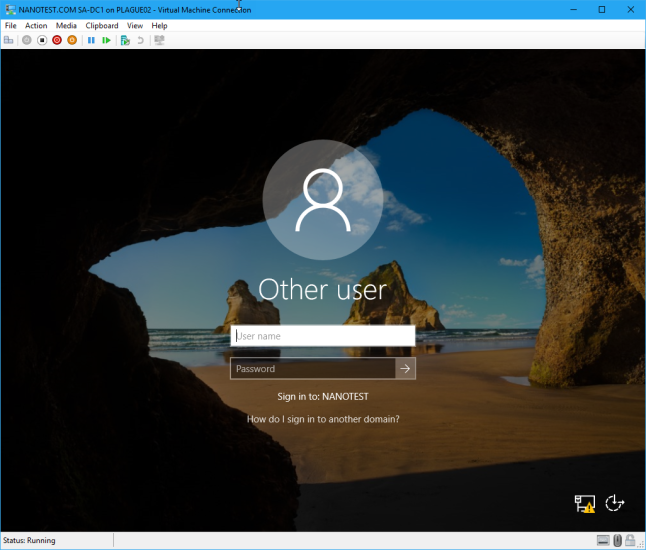
For the sample Lab the Domain Administrator account password is configured as P@ssword!1. This is set in the Lab Sample configuration and you can change it if you like.
Note: Nano Server is not designed to have an interactive GUI. You interact with Nano Server via PowerShell Remoting. You’ll want to have a basic knowledge of PowerShell and PowerShell Remoting before attempting to administer Nano Servers.
Shutting Down the Lab
Once the Lab has been completely built, you can shut it down with the Stop-Lab command. You need to pass the path to the Lab Configuration file to shut it down:
| $ConfigPath = Join-Path ` | |
| -Path (Split-Path -Path (Get-Module -Name LabBuilder -ListAvailable).Path -Parent) ` | |
| -ChildPath 'Samples\Sample_WS2016_NanoDomain.xml' | |
| Stop-Lab -ConfigPath $ConfigPath -Verbose |
The Virtual Machines in the Lab will be shut down in an order defined in the Lab Configuration file. This will ensure that the VMs are shut down in the correct order (e.g. shut down the domain controllers last).
Starting the Lab Up
If you need to start up a previously created Lab, use the Start-Lab command. You will again need to provide the path to the Lab Configuration file of the Lab you want to shut down:
| $ConfigPath = Join-Path ` | |
| -Path (Split-Path -Path (Get-Module -Name LabBuilder -ListAvailable).Path -Parent) ` | |
| -ChildPath 'Samples\Sample_WS2016_NanoDomain.xml' | |
| Start-Lab -ConfigPath $ConfigPath -Verbose |
The Virtual Machines in the Lab will be started up in an order defined in the Lab Configuration file. This will ensure that the VMs are started up in the correct order.
Uninstalling the Lab
If you want to completely remove a Lab, use the Uninstall-Lab command. You will again need to provide the path to the Lab Configuration file of the Lab you want to unisntall:
| $ConfigPath = Join-Path ` | |
| -Path (Split-Path -Path (Get-Module -Name LabBuilder -ListAvailable).Path -Parent) ` | |
| -ChildPath 'Samples\Sample_WS2016_NanoDomain.xml' | |
| Uninstall-Lab -ConfigPath $ConfigPath -Verbose |
Note: You will be asked to confirm the removals.
Wrapping Up
This article has hopefully given you a basic understanding of how to use LabBuilder to stand up a Hyper-V Lab in relatively short order and without a lot of commands and clicks. This project is still in Beta and so there may be bugs as well as some incomplete features. If you want to raise an issue with this project (or even submit a PR), head on over to the GitHub repository.

Hi, nice job.
Sorry my bad english, but i get the next error while deploy.
Mount-WindowsImage : The parameter is incorrect.
At C:\Program Files\WindowsPowerShell\Modules\LabBuilder\0.8.3.1107\lib\private\vhd.ps1:66 char:13
+ $null = Mount-WindowsImage `
+ ~~~~~~~~~~~~~~~~~~~~
+ CategoryInfo : NotSpecified: (:) [Mount-WindowsImage], PSArgumentException
+ FullyQualifiedErrorId : Microsoft.Dism.Commands.MountWindowsImageCommand
any idea ??
Thx by advance
LikeLike
Hi Luismi,
This is most likely caused by a corrupt Boot VHD that can’t be mounted correctly.
Each Boot VHD is created from a “template” VHD that will be created from the Windows Server ISO. If you look in the Sample_WS2016_NanoDomain.xml file you’ll be able to section <templatevhds vhdpath="”>. What you could try is deleting any VHD files in the and then try rebuilding the lab with Install-Lab. This will rebuild the template VHD’s from the Windows Server ISO files.
I hope that helps a little?
THanks
Dan
LikeLike
Hi, thanks Dan.
I start from zero,and install w2016 on my server.This time i don´t get the error, but now i get this…
Remove-VMNetworkAdapter : No se encontró ningún adaptador de red con los criterios especificados.
En C:\Program Files\WindowsPowerShell\Modules\LabBuilder\0.8.3.1107\lib\public\vm.ps1: 1125 Carácter: 13
+ Remove-VMNetworkAdapter `
+ ~~~~~~~~~~~~~~~~~~~~~~~~~
+ CategoryInfo : ObjectNotFound: (:) [Remove-VMNetworkAdapter], VirtualizationException
+ FullyQualifiedErrorId : ObjectNotFound,Microsoft.HyperV.PowerShell.Commands.RemoveVMNetworkAdapter
I try and try, and always get the same error on both computer with windows 10 and windows 2016.
Thx for help, and one more time, sorry my bad english.
LikeLike
Hey Dan!
I was following this guide and had some issues where ISOs could not be found during lab installation. Which paths need to be changed in the xml config if I’m attempting to use a standard Server 2016 iso? My host is Server 2016 Datacenter.
Thanks!
LikeLike
Hi Luismi,
Thanks for reading my post! LabBuilder will look for ISO files in the path specified in the templateVHDs node isopath attribute:
See this image: http://imgur.com/a/IY7k7
You’ll also want to make sure the ISO filenames in the templates match what you downloaded from Microsoft. They sometimes change them and I don’t realize so haven’t had a chance to update all the LabBuilder samples to use the new names.
Hope that helps?
LikeLiked by 1 person
Great setup but can you share how you configured your Edge Node (Routing and Remote Access server) to work with the other VM’s in the Lab. Also when I try to update the Nano server it seem to fail have you experienced this?
LikeLike
Hi Eliz,
Thank you!
Unfortunately the edge node setup has to be done manually because there is no DSC Resource (yet) to configure RRAS. So what I usually do is manually configure the RRAS server up by:
1. From Server Manager run Routing and Remote Access and connect to the SA-EDGE1 node:
http://imgur.com/a/qWsxd
2. Right click the SA-EDGE1 node and select Configure and Enable Routing and Remote access.
3. Click Next
4. Select NAT and click Next
5. Select the Adapter on your Edge node that is connected to the External Switch on your Hyper-V Lab host:
http://imgur.com/a/cZEAT
6. Click Next
7. Select the Network adapter connected to the Hyper-V private or internal switch that is used by your Lab LAN.
8. Click Next.
9. Click Finish.
After a few seconds the RRAS will be configured. You may get an error about ports, but this doesn’t actually cause us any problems. All your nodes should now have internet access. You should check that the Default Gateway that the DNS Server on SA-DC1 is pointing to the IP of SA-EDGE1. It should be already but worth checking.
The DNS Forwarder of the DNS Server (SA-DC1) should also be configured to use an external DNS Server (in my case I’m using Google’s DNS Servers):
http://imgur.com/a/DREDT
As for the Nano Servers, do you mean apply Windows Updates? I haven’t had any problem updating them, but you do need to use alternative methods to apply updates (e.g. the WindowsUpdate PowerShell Module won’t work). I did write a blog post on how to do this though: https://dscottraynsford.wordpress.com/2016/05/14/bulk-updating-nano-servers/
Hope that answers your questions!
LikeLike
please delete last comment about labuilder-domaincomplete. Sorry thanks Eilesh
LikeLike
No worries! No problem 🙂
LikeLike
Good job, i try a sample WS2016_Simple.xml, everything was perfect except the connection.
I get the following error
VERBOSE: [23:37:37]: Connection to VM ‘LABBUILDER-SIMPLE.COM SS-DEFAULT’ failed
(The client cannot connect to the destination specified in the request. Verify t
hat the service on the destination is running and is accepting requests. Consult
the logs and documentation for the WS-Management service running on the destina
tion, most commonly IIS or WinRM. If the destination is the WinRM service, run t
he following command on the destination to analyze and configure the WinRM servi
ce: “winrm quickconfig”. ), retrying in 5 seconds.
Get-Item : Cannot find path ‘localhost\Client\TrustedHosts’ because it does
not exist.
At C:\Program
Files\WindowsPowerShell\Modules\LabBuilder\0.8.3.1107\lib\public\vm.ps1:1603
char:30
+ … tedHosts = (Get-Item -Path WSMAN::localhost\Client\TrustedHosts).Valu …
+ ~~~~~~~~~~~~~~~~~~~~~~~~~~~~~~~~~~~~~~~~~~~~~~~~~~~
+ CategoryInfo : ObjectNotFound: (localhost\Client\TrustedHosts:S
tring) [Get-Item], ItemNotFoundException
+ FullyQualifiedErrorId : PathNotFound,Microsoft.PowerShell.Commands.GetIt
emCommand
Even if i connect to the VM via Hyper-v console and setup WinRM with command winrm quickconfig
I get the same error describe above.
Could you help me ?
Thanks
LikeLike
Yes i find a solution.
I get error from Winrm because my network adapter was in public network. So i have to change it before make the connection between my laptop and my virtual machine.
Just use simple powershell command
Set-NetConnectionProfile -InterfaceIndex 52 -NetworkCategory Private
I hope it will help someonelse.
Thanks
LikeLike
Nice job solving this Steve, and thanks for sharing it!
LikeLike
I keep getting this to use the Install-Lab command:
Install-Lab : A parameter cannot be found that matches parameter name ‘configpath’.
At line:1 char:13
+ install-lab -configpath ‘C:\Users\mlatham1.CENTURA\Downloads\LabBuild …
+ ~~~~~~~~~~~
+ CategoryInfo : InvalidArgument: (:) [Install-Lab], ParameterBindingException
+ FullyQualifiedErrorId : NamedParameterNotFound,Install-Lab
LikeLike
I forgot to mention that I am using LabBuilder version 0.8.3.1107 when I get the error:
Install-Lab : A parameter cannot be found that matches parameter name ‘configpath’.
At line:1 char:13
+ install-lab -configpath ‘C:\Users\mlatham1.CENTURA\Downloads\LabBuild …
+ ~~~~~~~~~~~
+ CategoryInfo : InvalidArgument: (:) [Install-Lab], ParameterBindingException
+ FullyQualifiedErrorId : NamedParameterNotFound,Install-Lab
LikeLike
Wow – not enough coffee – forgot to do a Import-module labbuilder – its working now. Sorry and thanks! It works great!
LikeLike
I’ve been there! Glad to hear it’s working! 🙂
LikeLike
Hi Daniel Probably I’ve discovered an issue with Get-DSCResource and xIPAddress IPv6
# no matter which vm
PS C:\Windows\system32> $env:COMPUTERNAME
SA-EDGE1
PS C:\Windows\system32> Get-DscConfiguration -Verbose
VERBOSE: An LCM method call arrived from computer SA-EDGE1 with user sid S-1-5-21-1328692572-3203178231-3736390581-500.
VERBOSE: [SA-EDGE1]: LCM: [ Start Get ]
VERBOSE: [SA-EDGE1]: [[xIPAddress]IPv4_1::[Networking]Network] Get-TargetResource: Getting the IP Address.
VERBOSE: [SA-EDGE1]: LCM: [ End Get ] [[xIPAddress]IPv4_1::[Networking]Network] in 0.0000 seconds.
VERBOSE: [SA-EDGE1]: [[xDefaultGatewayAddress]IPv4G_1::[Networking]Network] Get-TargetResource: Getting the Default Gateway Address.
VERBOSE: [SA-EDGE1]: LCM: [ End Get ] [[xDefaultGatewayAddress]IPv4G_1::[Networking]Network] in 0.0310 seconds.
VERBOSE: [SA-EDGE1]: [[xDNSServerAddress]IPv4D_1::[Networking]Network] Get-TargetResource: Getting the DNS Server Addresses.
VERBOSE: [SA-EDGE1]: LCM: [ End Get ] [[xDNSServerAddress]IPv4D_1::[Networking]Network] in 0.0000 seconds.
VERBOSE: [SA-EDGE1]: [[xIPAddress]IPv6_1::[Networking]Network] Get-TargetResource: Getting the IP Address.
Get-DscConfiguration : GetConfiguration did not succeed.
At line:1 char:1
+ Get-DscConfiguration -Verbose
+ ~~~~~~~~~~~~~~~~~~~~~~~~~~~~~
+ CategoryInfo : NotSpecified: (MSFT_DSCLocalConfigurationManager:root/Microsoft/…gurationManager) [Get-DscConfiguration], CimException
+ FullyQualifiedErrorId : MI RESULT 1,Get-DscConfiguration
PS C:\Windows\system32> Get-DscResource xipaddress
ImplementedAs Name ModuleName Version Properties
————- —- ———- ——- ———-
PowerShell xIPAddress xNetworking 3.2.0.0 {InterfaceAlias, IPAddress, AddressFamily, Depe…
LikeLike
Hi Moon,
As I’m a maintainer of the xNetworking DSC Resource I better look into this further. Thanks for reporting this. We did make some changes to the structure of xNetworking in 3.2.0.0 so this might have affected things. I’ll try rebuilding my lab with the 3.2.0.0 version.
Do have multiple Network controllers defined? Are you able to post a copy of the DSCNetworking.ps1 file in the LabBuilder Files folder in the folder where your VM (e.g. SA-EDGE1) is installed?
Thanks
Dan
LikeLike
actually having a few issues with the conversion script. I take it this is just a download of the nano server version on github https://github.com/PlagueHO/New-NanoServerVHD/blob/master/Convert-WindowsImage.ps1 ?
I have tried using an Eval ISO and Volume Lic version both with Nano wims. I keep hitting Cannot find path ‘HKLM:\Software\Microsoft\Windows
NT\CurrentVersion\WinPE’ because it does not exist..
LikeLiked by 1 person
I just copied a version from the Server ISO and everything is running fine now
LikeLike
Hi Christian,
That is good news. I try to keep Convert-WindowsImage.ps1 up-to-date, but I haven’t updated it in a little bit. The latest version from the Microsoft team can be found here:
https://github.com/Microsoft/Virtualization-Documentation/tree/live/hyperv-tools/Convert-WindowsImage
Thanks
Dan
LikeLike
Hi Christian,
can you please elaborate what you did here? I tried an updated Convert-WindowsImage.ps1 file as Daniel suggested below and it failed with multiple errors. Thanks in advance.
LikeLike
Hi George,
Any chance you could post a couple of the errors and I’ll take a look and see if something else has changed in Convert-WindowsImage.ps1.
Cheers!
LikeLike
hi,
how i can delete the VHD from my PC. something went wrong and i could not save the error message.moreover, how i can skip the powershell and use the gui interface.
LikeLike
Hi Yasir,
You should be able to delete the VHD’s from your PC by locating the folder you installed your lab to and deleting it (usually D:\LabBuilder). However, you’ll need to go into Hyper-V Manager and delete each VM from there first.
As for manually installing a Nano Server AD lab, that is a little harder with the GUI interface – it would take a very very long article to show how to do that as the number of steps required are quite significant. This is why I created LabBuilder in the first place 🙂
LikeLike
Hi Daniel,
Thanks for the great work with the labbuilder.
Im having some trouble executing the script, as I am getting a few exceptions as follows:
ThrowException : The default ISO Folder ‘d:\ISOs’ for VM template VHDs is not found.
At C:\Program Files\WindowsPowerShell\Modules\LabBuilder\0.8.3.1107\lib\public\templatevhd.ps1:75 char:9
+ ThrowException @ExceptionParameters
+ ~~~~~~~~~~~~~~~~~~~~~~~~~~~~~~~~~~~
+ CategoryInfo : InvalidArgument: (:) [ThrowException], Exception
+ FullyQualifiedErrorId : VMTemplateVHDISORootPathNotFoundError,ThrowException
ThrowException : The default VHD Folder ‘d:\VHDs’ for VM template VHDs is not found.
At C:\Program Files\WindowsPowerShell\Modules\LabBuilder\0.8.3.1107\lib\public\templatevhd.ps1:104 char:9
+ ThrowException @ExceptionParameters
+ ~~~~~~~~~~~~~~~~~~~~~~~~~~~~~~~~~~~
+ CategoryInfo : InvalidArgument: (:) [ThrowException], Exception
+ FullyQualifiedErrorId : VMTemplateVHDRootPathNotFoundError,ThrowException
Join-Path : Cannot find drive. A drive with the name ‘d’ does not exist.
At C:\Program Files\WindowsPowerShell\Modules\LabBuilder\0.8.3.1107\lib\public\templatevhd.ps1:151 char:24
+ $ISOPath = Join-Path `
+ ~~~~~~~~~~~
+ CategoryInfo : ObjectNotFound: (d:String) [Join-Path], DriveNotFoundException
+ FullyQualifiedErrorId : DriveNotFound,Microsoft.PowerShell.Commands.JoinPathCommand
I have already modified the sample file to:
As per step 4 in the description above.
But it still seems to try for the d:\ drive.
LikeLike
I meant to say I modified the path to c:\ISOs and c:\VHDs
LikeLike
The script kept hanging on: Waiting for Virtual Machine ‘NANOTEST.COM SA-dc1’ heartbeat, retrying in 1 seconds
I was looking if could find a solution, because when i query the vm with get-vmintegrationservice is gave this output
PS C:\WINDOWS\system32> Get-VMIntegrationService -vmname “TESTLAB.COM SA-DC1” -name heartbeat
VMName Name Enabled PrimaryStatusDescription
TESTLAB.COM SA-DC1 Heartbeat True
i could not get the primarystatusdescription go to OK, while the VM was on.
After disabling the heartbeat integration service in the guest, de script did continue.
This happened with all the vm’s, i use Windows 10 1703 as hyper-v host
LikeLike
Hi Martijn,
I am also having this problem myself and am trying to find a solution. I’m using the same version of Windows 10 and this seems to have started after I installed Redstone 2. This seems to happen with VM’s that are based on Windows Server 2016 (Server, Server Core, Nano). I’m trying to figure out a good solution to this. I’ll keep you posted.
Thanks
Dan
LikeLike
Hi,
this powershell module it a great done.
Thanks a lot for it Daniel.
But I’m facing the same issue than Luismi:
Remove-VMNetworkAdapter : Es wurde keine Netzwerkkarte gefunden, die die angegebenen Kriterien erfüllt.
In C:\Program Files\WindowsPowerShell\Modules\LabBuilder\0.8.3.1116\lib\public\vm.ps1:1125 Zeichen:13
+ Remove-VMNetworkAdapter `
+ ~~~~~~~~~~~~~~~~~~~~~~~~~
+ CategoryInfo : ObjectNotFound: (:) [Remove-VMNetworkAdapter], VirtualizationException
+ FullyQualifiedErrorId : ObjectNotFound,Microsoft.HyperV.PowerShell.Commands.RemoveVMNetworkAdapter
When I restart the lab installation again, I don’t run to that failure, but in a never ending loop:
“Waiting for Virtual Machine ‘KEYLAB.NET CLAMI’ heartbeat, retrying in 1 seconds.”
Even if the machine have successfully started.
I’m thankfull for any input.
LikeLike
Hi Mike,
Thanks for posting – I’m also getting this problem myself and am working on a solution. It seems to have only started recently – possibly when I upgraded to Windows 10 Creators Update. This appears to be an issue with the Heart beat mechanism in some VM’s. I’ll try and figure out some kind of work around this weekend. The reason I needed to wait for the heartbeat was to confirm that the OS had fully completed installation – but I might have to use some other detection method (e.g. remote into the OS and query CIM/WMI).
THanks
DAn
LikeLike
Hey this is great job. Thank you
LikeLike
Hi Daniel,
I also have the heartbeat issue.
Did you already find a solution?
Thanks.
Greetz,
Wigee
LikeLike
Hi Wigee,
Unfortunately it looks like a bug in Windows 10 Creators Edition (and even newer Insider Previews that I’ve tested it on).
I’ve posted on the Windows 10 Virtualizaton forums:
https://social.technet.microsoft.com/Forums/scriptcenter/en-US/16f11796-6e76-47e3-aede-a28dc06b0f87/heartbeat-returns-empty-operational-status-in-hyperv-on-windows-1015063-running-windows-server?forum=win10itprovirt
But so far I’ve got
nothing except an “accidental” confirmation that this happens to other users (see the screenshot from the Microsoft admin responding to my post).
What I’ll probably have to do is make a change to the LabBuilder module so that if it is running on Windows 10 Creators Edition it will accept an “empty” as an “OK” until Microsoft can give some sort of advise.
I’ll get this done tonight because I can’t wait for Microsoft any longer for a solution.
Cheers
Dan
LikeLike
Hi Wigee,
I’ve released a new version of the LabBuilder module. It “fixes” this problem (I’m not happy with the fix, but until MSFT fixes it for real this is a work around).
I’ve also updated this to support the new changes that were made to xNetworking (v5.0.0.0) that was released last week.
Cheers
Dan
LikeLike
Thx Dan,
It is now working.
Greetz,
Wigee
LikeLiked by 1 person
Dan,
Love the script. I’m hoping to/planning on tearing it up a bit, (unless you or someone has already done so) to ‘genericize’ the library. I am just a PowerShell noob, but decades ago did some database stuff in Clipper and PowerBuilder. Lots of rust in the noggin’, 🙂
In any event, I think this would be an even better library if there was a way to:
1. easily change for iso name/locations;
2. define additional network segments (multiple) and hosts on those networks;
a. ip addressing/naming
3. deploy individual elements(hosts) or networks of a lab definition
4. (As I think of this) read from an Excel Spreadsheet used as a data-source for an associated Visio drawing and/or export the XML to a spreadsheet that could be used for that.
In the end, I think it would be a wonderful way to build out a lab that simulates a multiple-site corporate network, and once satisfied and tested, each component host could be replicated in a production environment.
Thoughts?
LikeLike
Hi Daniel (great name BTW 🙂 ),
All help is gratefully accepted. I’ve not had much time lately to work on this module as most of my time is taken up on the Microsoft DSC Resource Kit (which is much of the core of LabBuilder).
I definitely had the intent to implement some of or similar features to what you’ve listed. So I’m definitely on board! 🙂
If you’re up for it, feel free to raise each item as an issue over on the github repo (https://github.com/PlagueHO/LabBuilder) and put a bit of detail around the plan and I’ll let you know if I can see any potential issues! As I said though, I’m grateful for the help.
I’ve got a fair amount of unit test coverage on the project, so that is usually the tough part to get right and keep working, but I’m always happy to help get those implemented (a great skill to have if you’re not familiar with the PowerShell test framework: Pester).
I definitely had intended this to be able to build multi-site corporate network infrastructure (and it actually can – I had a three site AD Domain with multiple VNETs deploying using it). But it is still a fairly steep learning curve.
We’d also intended on implementing a front end UI to help create lab files, but never got round to it.
Cheers
Dan
LikeLike
Hi,
thanks & great work.
where can the keyboard language be set?
Greetings Johannes
LikeLike
Hi There,
We’re actually working on adding support for this to the DSC Resource Kit (which labbuilder uses). Alternately I could add support into LabBuilder to set this during the initial bootup of each VM. I’ll log an issue in the GitHub repo.
LikeLike
Hi, I run the build lab, everything goes throiugh for creating the nano vhdx, in my directory
H:\Hyper-V\LabBuilder\VHDs, I can see
“Nano Server 2016 Datacenter.vhdx ”
but right away after succesful nano it errors on the Template Source for 2016 Datacenter Full.vhdx template here is the output of the script
VERBOSE: Target Image Version 10.0.14393.0
VERBOSE: Successfully added package H:\Hyper-V\LabBuilder\VHDs\NanoServerPackages\Microsoft-NanoServer-Guest-Package.cab
INFO : Package path: H:\Hyper-V\LabBuilder\VHDs\NanoServerPackages\en-us\Microsoft-NanoServer-Guest-Package_en-us.cab
VERBOSE: Target Image Version 10.0.14393.0
VERBOSE: Successfully added package H:\Hyper-V\LabBuilder\VHDs\NanoServerPackages\en-us\Microsoft-NanoServer-Guest-Package_en-us.cab
INFO : Dismounting VHDX…
VERBOSE: VHDX final path is : H:\Hyper-V\LabBuilder\VHDs\Nano Server 2016 Datacenter.vhdx
VERBOSE: Renaming VHDX at H:\Hyper-V\LabBuilder\VHDs\929a16a2-79f3-40c2-baef-b70781a94952.vhdx to Nano Server 2016 Datacenter.vhdx
INFO : Closing Windows image…
INFO : Done.
VERBOSE: [17:11:50]: Dismounting H:\Hyper-V\LabBuilder\ISOs\14393.0.161119-1705.RS1_REFRESH_SERVER_EVAL_X64FRE_EN-US.ISO used for source WIM to create Template VHD Nano Server 2016 Datacenter
New-LabException : The Template Source VHD ‘H:\Hyper-V\LabBuilder\VHDs\Windows Server 2016 Datacenter Full.vhdx’ in Template ‘Template Windows Server 2016 Datacenter Full’ could not be found.
At C:\Program Files\WindowsPowerShell\Modules\LabBuilder\1.0.5.105\LabBuilder.psm1:9032 char:17
+ New-LabException @exceptionParameters
+ ~~~~~~~~~~~~~~~~~~~~~~~~~~~~~~~~~~~~~
+ CategoryInfo : InvalidArgument: (:) [New-LabException], Exception
+ FullyQualifiedErrorId : TemplateSourceVHDNotFoundError,New-LabException
LikeLike