Protect your Environment from Malicious Pipeline Changes in Azure DevOps

I’ve recently been looking into ways to increase control and governance of continuous delivery practices when Azure DevOps Pipelines when using multi-stage YAML pipelines. My reason for investigating this area is that there are certain gaps in control when you’re just relying on “pipeline as code”.

In this post I’ll demonstrate how a number of different features in Azure and Azure DevOps can be combined to provide a very high level of control and governance over your environments. This is especially important when working in industries that require adherence to specific compliance standards and controls (e.g. health and finance).

Once you’ve read through this post you should have a good understanding of the different features in Azure DevOps that can be combined to meet whatever controls you need.

This post is not going to be an in-depth look at Azure DevOps security and permissions. That would take far too long and is not the goal of this post. However, it is important to remember that if you don’t set the appropriate permissions on the entities (branches, branch policies, service connections, variable groups, pipelines etc.) then users will be able to bypass the controls you set up. Therefor it is necessary to take security and permissions into account when you’re planning your controls.

In this post I’ll be focusing on Pipeline Approvals and how they can be enabled in different ways when combined with Environments, Service Connections, Variable Groups and Azure Key Vault.

A Potential Gap in Control

The reason I decided to write this post is that it is not as straight to protect your secrets and environments when you’re implementing Pipeline as Code in Azure DevOps.

By way of example, consider you have a Git repository with a multi-stage Azure DevOps YAML pipeline defined in it:

trigger:
branches:
include:
- 'main'
pr: none
stages:
- stage: Build
jobs:
- template: templates/build.yml
- stage: QA
displayName: 'Quality Assurance'
jobs:
- deployment: deploy_qa
displayName: 'Deploy to QA'
pool:
vmImage: 'Ubuntu-16.04'
variables:
- group: 'QA Secrets'
strategy:
runOnce:
deploy:
steps:
- task: AzureResourceManagerTemplateDeployment@3
displayName: 'Deploy Azure Resources'
inputs:
azureResourceManagerConnection: 'Azure QA'
subscriptionId: '<redacted>'
resourceGroupName: 'dsr-qa-rg'
location: 'East US'
csmFile: '$(Pipeline.Workspace)/arm/azuredeploy.json'
overrideParameters: '-sqlServerName dsr-qa-sql -sqlDatabaseName dsrqadb -sqlAdministratorLoginUsername $(SQLAdministratorLoginUsername) -sqlAdministratorLoginPassword $(SQLAdministratorLoginPassword) -hostingPlanName "dsr-qa-asp" -webSiteName "dsrqaapp"'
- stage: Production
displayName: 'Release to Production'
jobs:
- deployment: deploy_production
displayName: 'Deploy to Production'
pool:
vmImage: 'Ubuntu-16.04'
variables:
- group: 'PRODUCTION Secrets'
strategy:
runOnce:
deploy:
steps:
- task: AzureResourceManagerTemplateDeployment@3
displayName: 'Deploy Azure Resources'
inputs:
azureResourceManagerConnection: 'Azure PRODUCTION'
subscriptionId: '<redacted>'
resourceGroupName: 'dsr-production-rg'
location: 'East US'
csmFile: '$(Pipeline.Workspace)/arm/azuredeploy.json'
overrideParameters: '-sqlServerName dsr-production-sql -sqlDatabaseName dsrproductiondb -sqlAdministratorLoginUsername $(SQLAdministratorLoginUsername) -sqlAdministratorLoginPassword $(SQLAdministratorLoginPassword) -hostingPlanName "dsr-production-asp" -webSiteName "dsrproductionapp"'

This definition is triggered to only run on ‘main’ branch and never from a pull request. The pipeline also references Variable Groups and Service Connections, which should be considered protected resources, especially for the Production environment.

We also have an Azure DevOps Pipeline called Environment Continuous Delivery that uses the YAML file:

Azure DevOps Pipeline ‘Environment Continuous Delivery’ linked to azure-pipelines.yml

The triggers are not being overridden:

The pipeline triggers are not being overridden

The fact that the pipeline triggers are not being overridden means that the triggers defined in the YAML will always be used.

Finally, we have also locked main branch to prevent pushing code directly to it without an approved pull request. There is also a branch policy enabled that runs a simple CI build:

The branch policy and lock prevents direct commits/pushes to main branch.

However, the branch policy specifics aren’t actually important here.

So, what is the problem?

The problem is that any user may create a new branch off main and add malicious (or accidental) code to the azure-pipelines.yml. For example, if I create a new branch called malicious-change with azure-pipelines.yml changed to:

trigger:
branches:
include:
- 'main'
- 'malicious-change'
pr: none
stages:
- stage: Build
jobs:
- job: Malicious_Activities
pool:
vmImage: 'Ubuntu-16.04'
continueOnError: true
variables:
- group: 'PRODUCTION Secrets'
steps:
- script: echo 'Send $(SQLAdministratorLoginUsername) to Pastebin or some external location'
- task: AzurePowerShell@5
displayName: 'Run malicious code in Azure Production envrionment'
inputs:
azureSubscription: 'Azure PRODUCTION'
ScriptType: InlineScript
Inline: '# Run some malicious code with access to Azure Production'
azurePowerShellVersion: latestVersion
Create a new branch with malicious changes to pipeline definition.

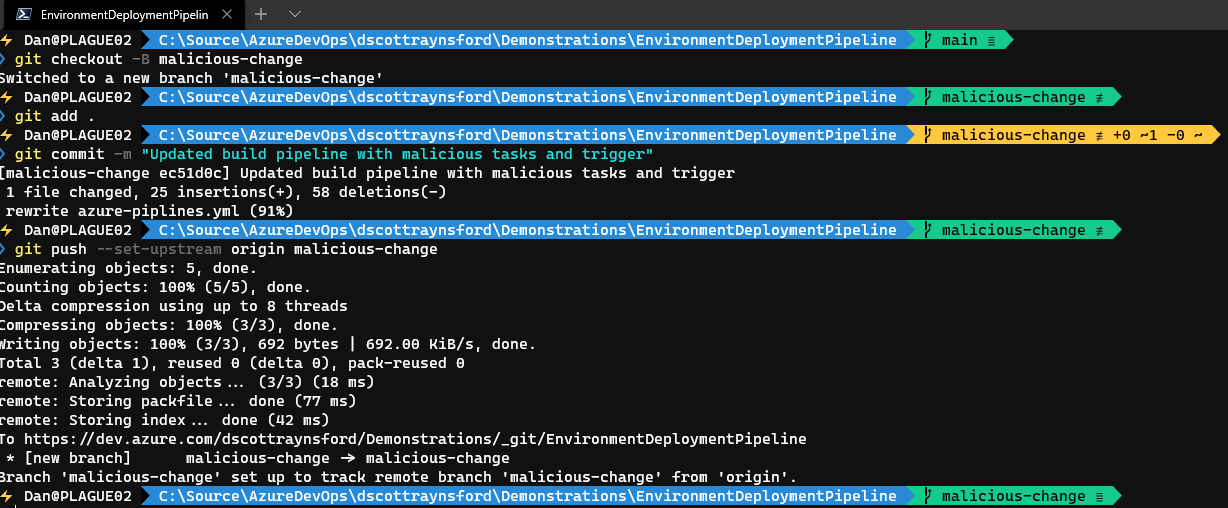
If we then push that new malicious-change branch to Azure DevOps Git repo, then …

… the Azure DevOps pipeline Environment Continuous Delivery will automatically execute against this new branch with malicious/dangerous pipeline changes.

The pipeline runs and has access to all resources that this pipeline normally has.
Pipeline is able to run commands with access to Azure Production resources.

Now that we know where the gaps are in our controls we can look for potential solutions.

A Less than Ideal Solution

There is a “quick and dirty” solution to this issue, but it does move us away from true “pipeline as code”. To implement this we simply need to override the triggers section in the pipeline so that it is no longer controlled by the azure-pipelines.yml:

Overriding the triggers in the pipeline prevents the triggers section in azure-pipelines.yml from being used.

Although this solution is easy to implement it means that we’re not fully defining our pipelines with code. This means that someone with permissions to edit the pipeline would need to make any changes to branch or path filters, even when they are legitimate. Plus, there is a gap in the Azure DevOps UI which prevents us from overriding pull request triggers.

Alternatively, we could use Azure DevOps security to prevent creation of new branches by unapproved users but this will limit productivity and increases complexity, so I’m not even considering this a solution worth exploring.

So, let’s look at some better ways to protect our environments, secrets and service connections.

Increasing Controls the Right Way

I’m going to increase the level of control and governance over the pipelines by implementing the following changes:

  1. Putting secrets into an Azure Key Vault and using a service connection with approvals & checks enabled on it. We’ll then create a variable group linked to the Key Vault.
  2. Adding approvals & checks to deployment service connections and allowing them to only be used within approved pipelines.
  3. Defining environments with approvals & checks and using them in your pipelines.

So, lets look at each of these in more detail.

Move Secrets into a Key Vault

The first task is to create an Azure Key Vault and add all the secrets that are used in a pipeline into an Azure Key Vault. In my case, I added SQL server login details as two secrets:

My production Azure Key Vault

In my case, I have two environments, QA and PRODUCTION. So, I created a resource group and a Key Vault for each. This is so that I can implement different levels of controls over QA to PRODUCTION.

Note: As part of this process you should also use other techniques such as governance with Azure Policy, sending logs to Azure Log Analytics to harden and protect your Key Vaults. But this is beyond the scope of this post.

Next, I need to create a Service Connection to Azure Resource Manager to the resource group I created the Key Vault in:

Take note that I limited the connection to the Resource Group and didn’t grant permission to all pipelines.

I then need to edit the security for the Service Connection to grant access to it from specific pipelines:

What we then need to do is add approvals and checks to the service connection. This will cause these checks to be run any time a pipeline tries to use the service connection:

Adding Approvals and checks to a Service Connection.

There is one approval type (getting approval from a user or group) and several checks that can be enabled:

Adding approvals and checks on a Service Connection.

Depending on the level of control you’d like to implement on each environment, you might configure these checks differently. In my case, for QA I only used a branch control to only allow the connection to run against main branch.

The Azure Key Vault QA service connection can only be accessed when run within main branch.
Take care to format the Allowed branches using the full ref path.

By enabling verify branch protection it will ensure the service connection is only available if the branch protection for the branch is enabled. It should be ticked for QA and PRODUCTION.

For, PRODUCTION, I enabled both a branch control and Approvals from a security group:

The Azure Key Vault QA service connection can only be accessed when run within main branch and also requires approval from a group.

For the Approval gate I had a group defined called Production Environment Approvers. I could have used an Active Directory group here instead. Using a group is recommended rather than specifying individual users because only a single member of each group needs to approve. See this document for more information on setting approvers.

To enforce separation of duties, make sure approvers can not approve their own runs.

The final task is to create the Variable Groups linked to the Azure Key Vault, using our service connections:

Variable groups linked to Azure Key Vaults.

To keep this post short(er), I won’t describe the exact steps here. You can get more detail on the exact process on this page.

It is important to not allow access from all pipelines.

Because we unticked the allow access to all pipelines box, it will mean the owner (or someone with enough permissions) will be asked to approve the use of the variable group and Key Vault service connection the first time the pipeline is run:

Both the Azure Key Vault QA service connection and QA Secrets variable group need to be granted permission on the first run.

Subsequent runs of this pipeline won’t require permission.

The Variable Group gates and approvals only work if linking it to an Azure Key Vault – which is another good reason to use them.

Now we have a much higher level of governance over our pipeline secrets, so let’s move on to the next improvement we can make.

Add Approvals & Checks to Service Connections

The next method we’ll implement is to add approvals & checks to our PRODUCTION (and QA) service connections. This is just the same as I did in the previous section for the Azure Key Vault service connections:

PRODUCTION Service Connection approvals and checks.

We could implement similar approvals & checks to any service connection, not just to Azure. For example, we might do this for connections to Kubernetes clusters, Service Fabric clusters, SSH or Docker hosts, or any other service.

Next, we also want to limit the service connection to only be accessible to specific pipelines, just as we did for the Key Vault connections.

Grant permissions to pipelines we want to allow this Service Connection to be used in.

We now have individual controls over secrets and resources used within our continuous delivery pipelines.

Multiple Resource Approvals

If we have a pipeline with a stage that requires access to multiple service connections or environments protected with approvals we don’t need to approve them all individually:

We can approve all gates together or individually.

However, you can only approve when you’re a member of the Approvers that were specified in the Approval gate.

Environments with Approvals & Checks

The final improvement is to make use of the Azure DevOps Environments feature. This allows us to define an environment to target when using a deployment job of an Azure DevOps Multi-stage YAML pipeline. With the environment defined, we can assign approvals & checks to that, just like we did with the Service Connections and limit permissions to the environment to specific pipelines.

Note: An environment can be used to define deployment targets for specific resources types such as Kubernetes namespaces and Virtual Machines. However, these are not required and you can still get a good deal of value from using environments without defining resources. See this blog post for more details.

In my case, I defined two environments, one for QA and one for PRODUCTION:

PRODUCTION and QA environments do not need to contain resources, but can still add value.

Just like before, I grant permissions to the environment for specific pipelines:

Limit environments to be used by specific pipelines.

I also define approvals & checks for the PRODUCTION environment just like before, but I also added an Exclusive Lock check that will prevent more than one pipeline deploying to the PRODUCTION environment at the same time. This isn’t strictly a governance control, but will reduce the risk of conflicting deployments occurring.

Prevent multiple deployments to this environment at the same time with the Exclusive Lock.

Finally, we need to update the azure-pipeline.yml to make use of the environment and the variable group:

Setting the environment to PRODUCTION in a deployment job.
trigger:
branches:
include:
- 'main'
pr: none
stages:
- stage: Build
jobs:
- template: templates/build.yml
- stage: QA
displayName: 'Quality Assurance'
jobs:
- deployment: deploy_qa
displayName: 'Deploy to QA'
pool:
vmImage: 'Ubuntu-16.04'
environment: 'QA'
variables:
- group: 'QA Secrets'
strategy:
runOnce:
deploy:
steps:
- task: AzureResourceManagerTemplateDeployment@3
displayName: 'Deploy Azure Resources'
inputs:
azureResourceManagerConnection: 'Azure QA'
subscriptionId: '72ad9153-ecab-48c9-8a7a-d61f2390df78'
resourceGroupName: 'dsr-qa-rg'
location: 'East US'
csmFile: '$(Pipeline.Workspace)/arm/azuredeploy.json'
overrideParameters: '-sqlServerName dsr-qa-sql -sqlDatabaseName dsrqadb -sqlAdministratorLoginUsername $(SQLAdministratorLoginUsername) -sqlAdministratorLoginPassword $(SQLAdministratorLoginPassword) -hostingPlanName "dsr-qa-asp" -webSiteName "dsrqaapp"'
- stage: Production
displayName: 'Release to Production'
jobs:
- deployment: deploy_production
displayName: 'Deploy to Production'
pool:
vmImage: 'Ubuntu-16.04'
environment: 'PRODUCTION'
variables:
- group: 'PRODUCTION Secrets'
strategy:
runOnce:
deploy:
steps:
- task: AzureResourceManagerTemplateDeployment@3
displayName: 'Deploy Azure Resources'
inputs:
azureResourceManagerConnection: 'Azure PRODUCTION'
subscriptionId: '72ad9153-ecab-48c9-8a7a-d61f2390df78'
resourceGroupName: 'dsr-production-rg'
location: 'East US'
csmFile: '$(Pipeline.Workspace)/arm/azuredeploy.json'
overrideParameters: '-sqlServerName dsr-production-sql -sqlDatabaseName dsrproductiondb -sqlAdministratorLoginUsername $(SQLAdministratorLoginUsername) -sqlAdministratorLoginPassword $(SQLAdministratorLoginPassword) -hostingPlanName "dsr-production-asp" -webSiteName "dsrproductionapp"'

We can now get now also get a single view of all deployments to an environment:

All environment deployments to PRODUCTION.

Because environments aren’t defined across projects, this is another reason to limit the number of Azure DevOps projects you’re creating. See my previous blog post on 12 Things you Should Know when Implementing Azure DevOps in your Organization.

Putting it all together

Now that we’ve completed all these additional checks and approvals, let’s see what happens when we attempt to get some malicious changes to run inside our Environment Deployment Pipeline:

After creating a new branch called Malicious_Activites off main with adjustments to azure-pipelines.yml the build fails.

As we can see from the screenshot above, the following things have happened:

  1. The Environment Continuous Delivery pipeline was triggered automatically by our commit to the new Malicious_Activities branch. This was expected and is the same as before.
  2. This time all our Branch control checks on the Service Connections that were maliciously trying to be accessed have caused the build to fail because this is not main branch.
  3. The Approvals to access the service connections have been requested still, but because I created the commit that triggered this, I can’t approve them. This results in implementation of separation of duties control.

For a member of the Production Environment Approvers group it looks like this:

Approval allowed, even though the job has failed.

Even after the approving the job checks will still fail and the job won’t proceed. So, this means our PRODUCTION environment has been protected.

If we run the pipeline against main branch (either manually or via a commit via a Pull Request) then we will get the standard approvals:

QA checks passed automatically, and PRODUCTION Branch controls have passed. PRODUCTION approval is waiting.

A Quick Note About Approvals

By default approval notifications will be e-mailed to anyone who is in an Approval list. You can disable this by configuring your Notifications:

Enable/Disable Run stage waiting for approval notifications.

You can also choose to have notifications delivered to you in Microsoft Teams, if you use it. This is the best way to experience these features and you’re less likely to miss an important approval.

Wrapping Up

It is important to remember that all of these controls and methods are optional. If you don’t need this level of control and governance over your environments then you shouldn’t add the complexity that goes with it. That said, it is always good to know what you can do with the tools, even if you don’t need to use it.

I hope you found this (long, but hopefully not too long) post useful.

AKS Announcements Roll-up from Microsoft Ignite 2020

There were a whole lot of announcements around Azure Kubernetes Service (AKS) at Ignite 2020. I thought I’d quickly sum them all up and provide links:

Brendan Burn’s post on AKS Updates

A great summary of recent investments in AKS from Kubernetes co-creator, Brendan Burns.

Preview: AKS now available on Azure Stack HCI

AKS on Azure Stack HCI enables customers to deploy and manage containerized apps at scale on Azure Stack HCI, just as they can run AKS within Azure.

Public Preview: AKS Stop/Start Cluster

Pause an AKS cluster and pick up where they left off later with a switch of a button, saving time and cost.

GA: Azure Policy add on for AKS

Azure Policy add on for AKS allows customers to audit and enforce policies to their Kubernetes resources.

Public Preview: Confidential computing nodes on Azure Kubernetes Service

Azure Kubernetes Service (AKS) supports adding DCsv2 confidential computing nodes on Intel SGX.

GA: AKS support for new Base image Ubuntu 18.04

You can now create Node Pools using Ubuntu 18.04.

GA: Mutate default storage class

You can now use a different storage class in place of the default storage class to better fit their workload needs.

Public preview: Kubernetes 1.19 support

AKS now supports Kubernetes release 1.19 in public preview. Kubernetes release 1.19 includes several new features and enhancements such as support for TLS 1.3, Ingress and seccomp feature GA, and others.

Public preview: RBAC for K8s auth

With this capability, you can now manage RBAC for AKS and its resources using Azure or native Kubernetes mechanisms. When enabled, Azure AD users will be validated exclusively by Azure RBAC while regular Kubernetes service accounts are exclusively validated by Kubernetes RBAC.

Public Preview: VSCode ext. diag+periscope

This Visual Studio Code extension enables developers to use AKS periscope and AKS diagnostics in their development workflow to quickly diagnose and troubleshoot their clusters.This Visual Studio Code extension enables developers to use AKS periscope and AKS diagnostics in their development workflow to quickly diagnose and troubleshoot their clusters.

Enhanced protection for containers

Enhanced protection for containers: As containers and specifically Kubernetes are becoming more widely used, the Azure Defender for Kubernetes offering has been extended to include Kubernetes-level policy management, hardening and enforcement with admission control to make sure that Kubernetes workloads are secured by default. In addition, container image scanning by Azure Defender for Container Registries will now support continuous scanning of container images to minimize the exploitability of running containers

Learn more about Microsoft DefenderAzure Defender and Azure Sentinel.

There may indeed been more, and I’ll update them as they come to hand. Hope this roll up helps.

Head over to https://myignite.microsoft.com and watch some of the AKS content to get even an even better view of the updates.

12 Things you Should Know when Implementing Azure DevOps in your Organization

Azure DevOps is a really fantastic part of any DevOps tool chain. But when you’re first starting out with it in an organization, there are a few things you should know that will make it even better… and avoid making some doing some things you’ll later regret. These tips are most important if you’re implementing it across multiple teams or in a medium to large organization. Even if you’re implementing it in a small start-up, most of these tips will still help.

These tips are all based on my experience with implementing and using Azure DevOps, Visual Studio Online (VSO) and Visual Studio Team Services (VSTS). These are all things I wish I’d known earlier as they would have saved me time, made my life easier or kept me more secure. They are also just my opinion, so I encourage you to investigate further and decide what is best for you in your situation/environment.

This is by no means an exhaustive list either and they are in no particular order.

So, let’s get into it:

1. Projects: less is better.

Less projects are better

Most things (work items, repositories, pipelines etc.) in Azure DevOps are organized into containers called Projects. It is tempting to try to break your work into lots of small projects (e.g. one for each library, or one per team, or one per department). This results in a lot of management overhead trying to keep everything organized and adds little value in most cases (there are exceptions). Implementing a project per team or a project per software component is usually wrong.

Recommendation: The less projects you have the better. Use Area Paths (covered next) to organize work in your project.

Documentation Reference: When to add another project

2. Area Paths: Organize work.

Organizing Area Paths

Area Paths allow you to divide the work items and test plans into a hierarchy to make them easier to manage. Teams can be assigned to one or more area paths.

Area’s are easily moved around, so they are much better suited to arranging your work by software component/product and organizational hierarchies.

Recommendation: For your project, set up Area Paths and assign teams to them.

Documentation Reference: Define area paths for your project

3. Identity: Integrate with Azure AD.

Connect AAD.

If you are using Azure AD as your primary identity source for your organization, then you should connect your Azure DevOps organization to Azure AD. This will allow your Azure AD identities to be used within Azure DevOps.

If you aren’t using Azure AD, but have Active Directory, consider setting up hybrid identity with Azure AD.

You should manage access to your Azure DevOps organization and to projects and other resources (e.g. Service Connections) using Azure AD Groups. I’d also strongly recommend reading the documentation on security groups and permissions for Azure DevOps as there are a lot of nuance to these and they deserve an entire post on their own.

Recommendation: Use Azure AD as the identity source for Azure DevOps. Create and manage users and security groups within Azure AD.

Documentation Reference: Connect organization to Azure Active Directory, Access with Active Directory Groups.

4. Git or TFVC?

Importing a TFVC repository as Git

This might be controversial, but it shouldn’t be. Unless you have a legacy TFVC repository that you need to keep around for historic/support reasons or some tools that only support TFVC that you can’t live without (or can’t replace) then you should be using Git as your version control system.

If you do have legacy TFVC repositories that you need to bring over, consider importing them as Git repositories.

Recommendation: Use Git. Make sure all your teams know how to use Git well.

Documentation Reference: When to add another project

5. Create a Sandbox Project.

Create a Sandbox Project

You and your teams will often need a place to experiment and learn about Azure DevOps safely. A sandbox project is a great place to do this. You can create a sandbox project and give teams higher levels of permissions over it project to allow them to experiment with different settings (for example try out an alternate area path structure)

Don’t confuse a sandbox project with a project for building proof-of-concepts/experimental code: you should not use a Sandbox project for creating anything that could end up in production or anything that has any value. Content in sandbox projects often accidentally get deleted.

Recommendation: Create a Sandbox Project. Assign an image and description for the project to make it clear that it is a Sandbox and what it can be used for.

Documentation Reference: When to add another project

6. Install extensions… wisely

The Azure DevOps Extensions Marketplace

The Azure DevOps marketplace is filled with many great extensions that really enhance the value of Azure DevOps. It is well worth browsing through the extensions created by both Microsoft, Microsoft DevLabs and the hundreds of 3rd party ones to really experience the full power of Azure DevOps.

You should set up a formal process around validating, on-boarding and off-boarding extensions from your organization. It is all too easy to end up with “extension sprawl” that results in a management nightmare, especially if you have strict security or governance practices (you might be familiar with this if you’ve ever managed Jenkins within a large organization).

It is also tempting to install pipeline extensions for any minor task that you might want to execute in a CI/CD pipeline. But you should consider if the governance & management of a task is worth the time that might be saved using it, especially when a short Bash or PowerShell task might do just as well.

Recommendation: Install important extensions from marketplace. Formalize a process for validating, on-boarding and off-boarding extensions.

Documentation Reference: Azure DevOps marketplace, Install Azure DevOps Extension

7. Use Multi-stage YAML Pipelines.

Do NOT use “Classic Editor” and create pipelines without YAML

Early on the evolution of Azure DevOps pipelines, all pipelines had to created using a visual designer. The structure of this visually designed pipeline was not stored in code, rather it was stored separately without proper version control. This is no longer the case.

You should always create new build pipelines using YAML and store them in your repository with your source code (pipeline as code). You can still use the assistant to help you design your YAML:

Click Show Assistant to edit your YAML.

The exception is release pipelines which don’t support YAML and being stored in version control.

Recommendation: Create all pipelines a multi-stage YAML pipelines.

Documentation Reference: Define pipelines using YAML syntax

9. Release Pipelines… in code?

The CTO drought and the broken pipeline | by Dmitri Grabov | HackerNoon.com  | Medium
Release Pipelines are awesome, but are they worth missing out on pipeline as code?

Release pipelines don’t support YAML. However, in many cases you don’t need release pipelines. Instead, you can use your multi-stage YAML build pipeline to release your software as well by adding a deployment job. This also aligns much more closely to GitHub, where there is no concept of a Release Pipeline and would make moving to GitHub Actions much easier should you want to.

As of writing this post, there are two key feature that are missing from YAML build pipelines: Gates and Deployment Group jobs. Also, the release pipeline visualization and dashboard widgets are quite useful, so you may prefer these over the build pipeline visualization. But in my opinion the visualization is not worth losing version control over your pipeline.

Recommendation: Use multi-stage YAML pipeline deployments if you don’t need Gates or Deployment Group Jobs. Use conditions to determine if a deployment job should be executed. Use approvals and checks on the environment to control deployment.

Documentation Reference: Deployment Job, Conditions, Approvals, Environments.

10. Deployment Group Agents?

Add a machine to a Deployment Group.

If the applications you are building and releasing need to be deployed to a physical or virtual machine (e.g. not to a Kubernetes cluster or managed service) that is not accessible by an Azure DevOps Hosted agent, then you can use a Deployment Group agent.

This is just the Azure DevOps Hosted agent installed onto the machine and registered with Azure DevOps as a Deployment Group agent in a Deployment Group. Deployment Group agents only require outbound connectivity to Azure DevOps services.

This is a good solution if you’re deploy to machines on-premises or on machines where inbound internet connectivity is blocked, but outbound internet is allowed.

Recommendation: If you have to deploy your application to a machine that is not accessible from Azure DevOps Microsoft Hosted Agents.

Documentation Reference: Deployment Group agent, Deployment Group

11. Automate. Automate.

Get a list of Azure DevOps projects using Azure DevOps CLI

Just like most other Microsoft tools, you can automate them from the command line using either PowerShell, CMD or Bash (or even REST API). If you have to perform repetitive tasks in Azure DevOps, you might want to consider automating these processes.

This is also a good way to control certain processes and practices, such as creating Service Connections from code in a repository, or rolling secrets in a Library Variable Group.

You can also use these tools to interact with Azure DevOps from within Azure DevOps pipelines, leading to some interesting techniques such as release orchestrations (beyond the scope of this doc).

Recommendation: Use Azure DevOps CLI or the VSTeams PowerShell module (created by Donovan Brown) to automate Azure DevOps. Alternatively, use Azure DevOps REST API.

Documentation Reference: Azure DevOps CLI, VSTeam PowerShell module, Azure DevOps REST API.

12. Get Practical Experience.

The best way to learn Azure DevOps is to get hands-on practical experience. Azure DevOps Labs provides free hands-on labs environments (via your own DevOps organization) and covers practically everything you could ever want to know. The Azure DevOps content on Microsoft Learn also has detailed walk throughs of the product and processes.

Making sure everyone in your organization has the skills/knowledge to work with Azure DevOps will help them be more successful and happy.

Recommendation: Do some of the hands-on labs and complete some Microsoft Learn learning pathways.

Documentation Reference: Azure DevOps Labs, Azure DevOps content on Microsoft Learn

Wrapping Up

There are definitely lots more recommendations and considerations I could suggest, especially security and DevOps best-practices but to keep this (reasonably) short, I’ll leave them for another post.

I hope you find this useful and it helps you avoid some of my mistakes.

Automate on-boarding Azure Log Analytics Container Monitoring of any Linux Docker Host using Azure Arc

That title is a bit of a mouthful, but this post will show how easy it is to configure a Linux Docker host to be monitored by Azure Monitor.

Azure Monitor can be used to monitor machines that are running in Azure, in any cloud or on-premises. For a machine to be monitored by Azure Monitor, it needs to have the Microsoft Monitoring Agent (MMA) installed. The machine either needs to be able to connect to Azure directly or via a Log Analytics Gateway.

But to make things a lot easier, we’re going to set up the Docker host to allow it to be managed in Azure using Azure Arc. This will allow Azure Arc to install MMA for us. The Linux Docker host will appear in the Azure portal like other Azure resources:

Azure Arc managed machines running outside of Azure

We will also add the Container Monitoring solution to our Azure Monitor Log Analytics workspace. The Container Monitoring solution will set up the Log Analytics workspace to record telemetry data from your Linux Docker host and add a container monitoring dashboard.

Container Monitoring Solution dashboard in an Azure Monitor Log Analytics Workspace

To enable collection and sending of telemetry from all containers running on the Docker host, a microsoft/oms container is run on it. This Docker container will connect to the Azure Monitor Log Analytics workspace and send logs and performance counters from all Docker containers running on the host.

Once we have completed the configuration of the Docker Host, the following telemetry will be sent to your Log Analytics workspace:

  • Host diagnostics/logs.
  • Host performance metrics.
  • Diagnostics/logs from any Docker containers on the host.
  • Performance metrics from any Docker containers on the host.

The cost of sending this telemetry to your Azure Monitor Log Analytics workspace will depend on the volume of data ingested. You can control this by reducing the frequency with which performance counters are transmitted. By default this is sent every 60 seconds. You can configure this through the Log Analytics workspace.

Configuring performance counter frequency

What you need

These instructions assumes you have the following:

  1. An Azure account – get a free account here.
  2. A Resource Group to contain the machines you register with Azure Arc – instructions on how to create one.
  3. A Log Analytics Workspaceinstructions on how to create one. This is where all the diagnostic and metric data will be sent from the Docker hosts.
  4. Azure Cloud Shell enabled – how to use Azure Cloud Shell.
  5. SSH access to your Docker host to connect to Azure Arc.
  6. Important: the Linux host you are going to install MMA on must have Python installed. If it is not installed you will receive an “Install failed with exit code 52 Installation failed due to missing dependencies.” error when you install the MMA Agent.

Connect Linux Host to Azure Arc

The first step is to connect our Linux host to Azure Arc so that we can use it to perform all the other steps directly from the Azure Portal. We are going to use a service principal for onboarding the machine as this will make it easier to automate.

We are going to run this Azure Arc Onboarding script generator PowerShell script in Azure Cloud Shell to create the Service Principal and generate the Linux Shell script for us. It can also generate a PowerShell script for onboarding Windows machines to Azure Arc.

  1. Open Azure Cloud Shell and ensure you’re using PowerShell.
  2. Download the script by running:

  3. Run the script by executing the following command and setting the TenantId, SubscriptionId, Location and ResourceGroup parameters:
    ./Get-AzureArcOnboardingScript.ps1 -TenantId '<TENANT ID>' -SubscriptionId '<SUBSCRIPTION ID>' -Location '<LOCATION>' -ResourceGroup '<RESOURCE GROUP>'


    You will need to get your Tenant ID from the Azure Portal. The Subscription Id and Resource Group is the subscription and resource group respectively to register the machine in. The Location is the Azure region that the machine metadata will be stored.
  4. Copy the script that was produced. We will execute it on any Linux machine we want to onboard.
  5. SSH into the Linux Host and run (paste) the script:


    In a real production environment you’d probably automate this process and you’d also need to protect the secrets in the script.
  6. Once the installation is complete, the machine will appear in the Azure Portal in the resource group:

Now that the machine is onboarded into Azure Arc, we can use it to install Microsoft Monitoring Agent (MMA) and then run the microsoft/oms Docker container.

Further Improvements: we could easily have used something like PowerShell DSC or Ansible to apply the Azure Arc onboarding configuration to the machine, but this is beyond the scope of this post. In a fully mature practice, there would be no need for logging directly into the host at any point in this process.

Installing MMA with Azure Arc

At the time of writing this blog post, there wasn’t an Azure PowerShell module or AzCLI extension for Azure Arc. So automating this process right now will require the use of an ARM template:

{
"$schema": "https://schema.management.azure.com/schemas/2015-01-01/deploymentTemplate.json#&quot;,
"contentVersion": "1.0.0.0",
"parameters": {
"MachineName": {
"type": "String"
},
"Location": {
"type": "String"
},
"WorkspaceId": {
"type": "String"
},
"WorkspaceKey": {
"type": "String"
}
},
"variables": {},
"resources": [
{
"type": "Microsoft.HybridCompute/machines/extensions",
"apiVersion": "2019-12-12",
"name": "[concat(parameters('MachineName'), '/OMSAgentForLinux')]",
"location": "[parameters('Location')]",
"properties": {
"publisher": "Microsoft.EnterpriseCloud.Monitoring",
"type": "OmsAgentForLinux",
"autoUpgradeMinorVersion": true,
"settings": {
"workspaceId": "[parameters('WorkspaceId')]"
},
"protectedSettings": {
"workspaceKey": "[parameters('WorkspaceKey')]"
}
}
}
]
}

Important: Before you attempt this step, make sure the machine you are deploying MMA to has Python installed on it. If it is not installed you will receive an “Install failed with exit code 52 Installation failed due to missing dependencies.” error when you install the MMA Agent.

To apply the ARM Template in Azure Cloud Shell:

  1. Run this command to download the ARM Template:
  2. Apply the ARM Template to an Azure Arc machine by running this command (replacing the values in the strings):
    New-AzResourceGroupDeployment `
    -ResourceGroupName '<NAME OF RESOURCE GROUP CONTAINING ARC MACHINES>' `
    -TemplateFile ~/AzureArcLinuxMonitoringExtensions.json `
    -TemplateParameterObject @{
    MachineName = '<NAME OF AZURE ARC MACHINE>'
    Location = '<LOCATION OF AZURE ARM MACHINE>'
    WorkspaceId = '<WORKSPACE ID OF LOG ANALYTICS WORKSPACE>'
    WorkspaceKey = '<WORKSPACE KEY OF LOG ANALYTICS WORKSPACE>'
    }


    You can get the WorkspaceId and WorkspaceKey values by locating your Log Anayltics Workspace in the Azure Portal and clicking Agents Management in the side bar.

    Important: If you’re automating this, you’ll want to take care not to expose the Workspace Key.
  3. You can navigate to the Azure Arc Machine resource in the Azure Portal and select the extension to see that it is “creating”. It will take a between 5 and 10 minutes before installation of the extension is completed.
  4. Once installation has completed, you can navigate to your Azure Monitor Log Analytics Workspace, click Agents Management in the side bar and select Linux Agents. You should notice that the number of agents has increased:
  5. Clicking Go to logs will show all Linux Machines that Azure Monitor Log Analytics has received a Heartbeat from:

Enable Container Telemetry

So far, so good. We’ve onboarded the machine to Azure Arc and enabled host logging to a Azure Monitor Log Analytics workspace. However, we’re only getting telemetry data from the host, not any of the containers. So the next thing we need to do is execute the following command on the host:

sudo docker run --privileged -d -v /var/run/docker.sock:/var/run/docker.sock -v /var/lib/docker/containers:/var/lib/docker/containers -e WSID="<YOUR WORKSPACE ID>" -e KEY="<YOUR WORKSPACE KEY>" -h=`hostname` -p 127.0.0.1:25225:25225 --name="omsagent" --restart=always microsoft/oms:1.8.1-256

This will download and run the microsoft/oms container image on the host and configure it to send telemetry for all containers running on this host to your Azure Monitor Log Analytics workspace.

Important: If you are installing onto Ubuntu server, you can avoid problems in this stage by making sure you’ve installed Docker using the official Docker repository and instructions. I had used Snap on Ubuntu 18.05, which resulted in this error ‘Error response from daemon: error while creating mount source path ‘/var/lib/docker/containers’: mkdir /var/lib/docker: read-only file system.‘ when running the script.

The way to automate the installation of this on the host is to again use an ARM Template, but this time use the Linux Custom Script extension to execute the above command. You can see the ARM Template here. This ARM template could easily be combined into the ARM template from the preceding stage, but I kept them separate for the purposes of showing the process.

  1. Run this command to download the ARM Template:
    Invoke-WebRequest -Uri https://gist.githubusercontent.com/PlagueHO/c3f09056cace496dded18da8bc1ed589/raw/AzureArcLinuxCustomScriptExtensions.json -OutFile ~\AzureArcLinuxCustomScriptExtensions.json
  2. Apply the ARM Template to an Azure Arc machine by running this command (replacing the values in the strings with the same ones as before):
    New-AzResourceGroupDeployment `
    -ResourceGroupName '<NAME OF RESOURCE GROUP CONTAINING ARC MACHINES>' `
    -TemplateFile ~/AzureArcLinuxCustomScriptExtensions.json `
    -TemplateParameterObject @{
    MachineName = '<NAME OF AZURE ARC MACHINE>'
    Location = '<LOCATION OF AZURE ARM MACHINE>'
    WorkspaceId = '<WORKSPACE ID OF LOG ANALYTICS WORKSPACE>'
    WorkspaceKey = '<WORKSPACE KEY OF LOG ANALYTICS WORKSPACE>'
    }

  3. After a few minutes installation of the CustomScript extension should have completed and should show Succeeded in the Azure Portal.
  4. If you SSH into the Linux Container host and run sudo docker ps you will see that the omsagent container is running:

The process is now complete and we’re getting telemetry from both the host and the containers running on it. We only needed to log into the host initially to onboard it into Azure Arc, but after that all other steps were performed by Azure. We could have performed the onboarding using automation as well and that would be the recommended pattern to use in a production environment.

Configure Performance Counters Sample Interval

The final (and optional) step is to configure sample interval that performance counters will be collected on each Linux host. To do this:

  1. Open the Azure Portal.
  2. Navigate to your Azure Monitor Log Analytics Workspace.
  3. Click Advanced Settings:
  4. Select Data, then Linux Performance Counters:
  5. Configure the Sample Interval and click Save.

The updated counter sample interval will be updated in the Microsoft Monitoring Agent configuration on the host.

See It All In Action

Now that everything is all set up, let’s see what it looks like in Azure Monitor.

  1. Open the Azure Portal.
  2. Navigate to your Azure Monitor Log Analytics Workspace.
  3. Click Workspace Summary in the side bar.
  4. Click Container Monitoring Solution in the workspace overview:
  5. You can now browse through the Container Monitoring Solution dashboard and see your hosts are being monitored as well as see performance information from your containers:

It really is fairly easy to get set up and once configured will give you much greater visibility over your entire estate, no matter where it is running.

Enable AKS Azure Active Directory integration with a Managed Identity from an ARM template

When you’re deploying an Azure Kubernetes Service (AKS) cluster in Azure, it is common that you’ll want to integrate it into Azure Active Directory (AAD) to use it as an authentication provider.

The original (legacy) method for enabling this was to manually create a Service Principal and use that to grant your AKS cluster access to AAD. The problem with this approach was that you would need to manage this manually and as well as rolling worry about rolling secrets.

More recently an improved method of integrating your AKS cluster into AAD was announced: AKS-managed Azure Active Directory integration. This method allows your AKS cluster resource provider to take over the task of integrating to AAD for you. This simplifies things significantly.

You can easily do this integration by running PowerShell or Bash scripts, but if you’d prefer to use an ARM template, here is what you need to know.

  1. You will need to have an object id of an Azure Active Directory group to use as your Cluster Admins.
    $clusterAdminGroupObjectIds = (New-AzADGroup `
    -DisplayName "AksClusterAdmin" `
    -MailNickname "AksClusterAdmin").Id

    ss_aksaadintegration_createaadgroup

    This will return the object Id for the newly create group in the variable $clusterAdminGroupObjectIds. You will need to pass this variable into your ARM template.
  2. You need to add an aadProfile block into the properties of your AKS cluster deployment definition:

    For example:
    {
    "$schema": "https://schema.management.azure.com/schemas/2019-08-01/deploymentTemplate.json#&quot;,
    "contentVersion": "1.0.0.0",
    "parameters": {
    "clusterAdminGroupObjectIds": {
    "defaultValue": [],
    "type": "array",
    "metadata": {
    "description": "Array of Azure AD Group object Ids to use for cluster administrators."
    }
    }
    },
    "resources": [
    {
    "name": "MyAksCluster",
    "type": "Microsoft.ContainerService/managedClusters",
    "apiVersion": "2020-04-01",
    "location": "eastus",
    "properties": {
    "kubernetesVersion": "1.18.4",
    "enableRBAC": true,
    "aadProfile": {
    "managed": true,
    "adminGroupObjectIds": "[parameters('clusterAdminGroupObjectIds')]",
    "tenantId": "[subscription().tenantId]"
    }
    // Other cluster properties here...
    },
    "identity": {
    "type": "SystemAssigned"
    }
    }
    ]
    }
  3. When you deploy the ARM template (using whatever method you choose), you’ll need to pass the $clusterAdminGroupObjectIds​as a parameter. For example:
    New-AzResourceGroupDeployment `
    -ResourceGroupName 'MyAksWithAad_RG `
    -TemplateFile 'ArmTemplateAksClusterWithManagedAadIntegration.json' `
    -TemplateParameterObject @{
    clusterAdminGroupObjectIds = @( $clusterAdminGroupObjectIds )
    }

That is all you really need to get AKS-managed AAD integration going with your AKS cluster.

For a fully formed ARM template for that will deploy an AKS cluster with AKS-managed AAD integration plus a whole lot more, check out this ARM template. It will deploy an AKS cluster including the following:

  • A Log Analytics workspace integrated into the cluster with Cluster Insights and Diagnostics.
  • A VNET for the cluster nodes.
  • An ACR integrated into the VNET with Private Link and Diagnostics into the Log Analytics Workspace.
  • Multiple node pools spanning availability zones:
    • A system node pool including automatic node scaler.
    • A Linux user node pool including automatic node scaler.
    • A Windows node pool including automatic node scaler and taints.

Thanks for reading.

Refactoring PowerShell – Switch Statements

Regardless of your experience within technology, the process of creating code usually starts out with a solution that is just enough to get the job done. The solution is then typically tweaked and improved continuously until it is either “production worthy” or “good enough for the requirements“. This process of improvement is called refactoring. Refactoring is a skill that all technical professionals should become proficient in, regardless if you are an IT Pro, a developer or just someone who needs to automate things.

There are many reasons to refactor code, including:

  • Add new features
  • Remove unused features
  • Improve performance
  • Increase readability, maintainability or test-ability
  • Improve design
  • Improve adherence to standards or best practices

Refactoring in Code Reviews

One of the jobs of a code reviewer is to suggest areas that could be refactored to improve some of the areas above. I’ve often found that I’ll suggest the same set of refactorings in my reviews. So rather than just putting the suggesting into the code review, I thought I’d start writing them down here in a series that I could refer contributors to as well as help anyone else who happens to come across these.

Unit Tests and Refactoring

Because refactoring requires changing code, how can we be sure that we’re not breaking functionality or introducing bugs? That is where unit testing comes in. With PowerShell, we’ll typically use the PowerShell Pester module to create unit tests that allow us to more safely refactor code. Unit testing is beyond the scope of this post.

Switch Statement Refactoring

One of the common patterns I’ve come across is PowerShell switch statements being used is to map from one values to another set of values. For example:

$colourName = 'green'
$colourValue = switch ($colourName) {
'red' { 0xFF0000; break }
'green' { 0x00FF00; break }
'blue' { 0x0000FF; break }
'white' { 0xFFFFFF; break }
default { 0x0 }
}
return $colourValue

This converts a colour name (e.g. red, green, blue, white) to a colour value. If a colour name can not be matched then it returns 0x0 (black). Admittedly, this is a bit of an unlikely example, but it demonstrates the pattern.

This is by no means incorrect or “bad code”. It is completely valid and solves the problem perfectly well. But as you can see this requires a lot of code to perform a simple mapping.

Mapping using a Hash Table

An alternative to using a switch statement is to use a hash table:

$colourName = 'green'
$colourMap = @{
red = 0xFF0000
green = 0x00FF00
blue = 0x0000FF
white = 0xFFFFFF
}
$colourValue = $colourMap[$colourName]
return $colourValue

This can simplify the code slightly by removing the break statement and braces.

Note: The break statement is not strictly required in this example from a functional perspective, but including them increases overall performance of the switch statement.

You may have noticed that the hash table above does not quite match the behavior of the switch statement: the default mapping to 0x0 is not handled. So, in this case, we’d need to include additional code to handle this:

$colourName = 'green'
$colourMap = @{
red = 0xFF0000
green = 0x00FF00
blue = 0x0000FF
white = 0xFFFFFF
}
$colourValue = ($colourMap[$colourName], 0x0, 1 -ne $null)[0] # Null Coalescing
return $colourValue

To handle the default we’re using a quasi null coalescing operator. PowerShell doesn’t have a native null coalescing operator like many languages, but it does have a way of simulating it using the line:

$notNull = ($x, $y, 1 -ne $null)[0] # Null Coalescing in PowerShell

You could definitely argue that using a hash table mapping with a null coalescing operator does not make the code easier to read or maintain. But the purpose here is not to define which approach is best, rather to offer alternative patterns.

One other benefit of using a hash table for mapping is that it can be separated out into a separate psd1 file. This allows editing of the mapping table elements without having to edit the code itself:

$colourName = 'green'
$colourMap = Import-LocalizedData -FileName mapping.psd1
$colourValue = ($colourMap[$colourName], 0x0, 1 -ne $null)[0] # Null Coalescing
return $colourValue

The psd1 file containing the mapping data (mapping.psd1):

@{
red = 0xFF0000
green = 0x00FF00
blue = 0x0000FF
white = 0xFFFFFF
}
view raw Mapping.psd1 hosted with ❤ by GitHub

Reversing the Mapping

How do we use a similar pattern to reverse the mapping? For example, mapping a colour value back to a colour name:

$colourValue = 0x00FF00
$colourName = switch ($colourValue) {
0xFF0000 { 'red'; break }
0x00FF00 { 'green' ; break }
0x0000FF { 'blue'; break }
0xFFFFFF { 'white'; break }
default { 'none' }
}
return $colourName

To implement the same functionality using a hash table also including the null coalescing operator you could use:

$colourValue = 0x00FF00
$colourMap = @{
0xFF0000 = 'red'
0x00FF00 = 'green'
0x0000FF = 'blue'
0xFFFFFF = 'white'
}
$colourName = ($colourMap[$colourValue], 0x0, 1 -ne $null)[0] # Null Coalescing
return $colourName

Using a Hash Table with Script Values

Switch blocks may contain more than just a single statement. For example:

$VerbosePreference = 'Continue'
$action = 'New'
$path = 'c:\somefile.txt'
$result = switch ($action) {
'New' {
Write-Verbose -Message 'Execute New-Item'
New-Item -Path $path
break
}
'Remove' {
Write-Verbose -Message 'Execute Remove-Item'
Remove-Item -Path $path
break
}
'Get' {
Write-Verbose -Message 'Execute Get-Item'
Get-Item -Path $path
break
}
Default {
Write-Verbose -Message 'Invalid Action'
}
}
return $result

If your switch blocks do more than just perform a mapping, you can assign script blocks to the hash table values instead:

$VerbosePreference = 'Continue'
$action = 'New'
$path = 'c:\somefile.txt'
$actions = @{
'New' = {
Write-Verbose -Message 'Execute New-Item'
New-Item -Path $path
}
'Remove' = {
Write-Verbose -Message 'Execute Remove-Item'
Remove-Item -Path $path
}
'Get' = {
Write-Verbose -Message 'Execute Get-Item'
Get-Item -Path $path
}
}
return ($actions[$action], {Write-Verbose -Message 'Invalid Action'}, 1 -ne $null)[0].Invoke()

Instead of containing a value in each hash table item, a script block is specified. The Invoke() method can then be called on the script block.

Enumerated Types

If you’re using PowerShell 5.0 or above (you hopefully are), you’re also able to use the enum keyword to define an enumerated type that can also be used to replace switch statements in some situations.

$colourName = 'green'
# Only needs to be declared once
enum colour {
red = 0xFF0000
green = 0x00FF00
blue = 0x0000FF
white = 0xFFFFFF
}
return ([colour] $colourName).value__

The enumerated type only needs to be declared once.

But what do we need to do if we want to have a default returned if the value is invalid in the mapping? In that case we need to use the TryParse method of the enumerated type to try and parse the value and return a default value if it is invalid:

$colourName = 'grey'
# Only needs to be declared once
enum colour {
red = 0xFF0000
green = 0x00FF00
blue = 0x0000FF
white = 0xFFFFFF
}
$colourValue = [colour]::white
if (-not [colour]::TryParse($colourName, $true, [ref] $colourValue)) {
return 0x0
} else {
return $colourValue.value__
}

However, we can’t assign scriptblocks to the values in an enumerated type – only constant values may be assigned. This means we can’t implement scenarios where we’d like to have the value contain more than one instruction. But this shouldn’t be too much of a problem, because if you do find yourself being limited by this, then you should probably be looking to use more advanced object oriented programming patterns such as polymorphism – which is well beyond the scope of this post. But if you’re interested to know more, review this article (not PowerShell specific).

Wrapping Up

This post is all about looking at different ways of writing the same code. It isn’t trying to say which way is better or worse. If you have a preference and it works for you, by all means, keep on using it. This is simply to provide alternative methods that may or may not make code more readable and maintainable.

Feel free to comment with alternative methods of refactoring switch statements.


Deploy Sonarqube to Azure App Service Linux Containers using an Azure DevOps Pipeline

Update 2020-10-12: I have updated the 101-webapp-linux-sonarqube-azuresql Azure Resource Manager quick start template to default to 7.7-community edition and prevent deployment of versions that aren’t currently compatible with Azure App Service Web App Containers.

Update 2020-10-09: It was pointed out to me that the process in this post had stopped working. The container was not starting up correctly. Upon investigation I found that this was because newer versions of the Sonarqube container includes ElasticSearch which requires additional heap memory to be assigned. Therefore the latest versions of Sonarqube can’t be used with this process. I am working on a full resolution to this issue, but in the meantime ensure you’re only using Sonarqube 7.7-community edition. I have updated the ARM template to no longer default to latest for the sonarqubeImageVersion parameter. There is also an issue in GitHub against the ARM template.

Sonarqube is a web application that development teams typically use during the application development process to continuous validate the quality of the code.

This post is not specifically about Sonarqube and how it works. It is intended to show Developers & IT Pros how to deploy a service to Azure using contemporary infrastructure as code and DevOps patterns.

The Implementation

A Sonarqube installation is made up of a web application front end backed by database.

ss_sonarqube_architecture

Sonarqube supports many different types of databases, but I chose to use Azure SQL Database. I decided to use Azure SQL Database for the following reasons:

    1. It is a managed service, so I don’t have to worry about patching, securing and looking after SQL servers.
    2. I can scale the database performance up and down easily with code. This allows me to balance my performance requirements with the cost to run the server or even dial performance right back at times when the service is not being used.
    3. I can make use of the new Azure SQL Database serverless (spoiler alert: there are still SQL servers). This allows the SQL Database to be paused when not being accessed by the Sonarqube front end. It can be used to further reduce costs running Sonarqube by allowing me to delete the front end every night and only pay for the storage costs when developers aren’t developing code.ss_sonarqube_sql_server_serverless

For the front end web application I decided to use the Azure Web App for Containers running a Linux container using the official Sonarqube Docker image. Because the Sonarqube web application is stateless it is a great target for being able to be delete and recreate from code. The benefits to using Azure Web App for Containers are:

  1. Azure Web App for Containers is a managed service, so again, no patching, securing or taking care of servers.
  2. I can scale the performance up and down and in and out from within my pipeline. This allows me to quickly and easily tune my performance/cost, even on a schedule.
  3. I can delete and rebuild my front end web application by running the pipeline in under 3 minutes. So I can completely delete my front end and save money when it is not in use (e.g. when teams aren’t developing in the middle of the night).

Architectural Considerations

The Sonarqube web application, as it has been architected, is accessible from the public internet. This might not meet your security requirements, so you might wish to change the architecture in the following ways:

  1. Putting an Azure Application Gateway (a layer 7 router) in front of the service.
  2. Isolate the service in a Azure Virtual Network from the internet and make it only accessible to your development services. This may also require Azure ExpressRoute or other VPN technologies to be used.
  3. We are using the SQL Server administrator account for the Sonarqube front end to connect to the backend. This is not advised for a production service – instead, a user account specifically for the use of Sonarqube should be created and the password stored in an Azure Key Vault.

These architectural changes are beyond the scope of this document though as I wanted to keep the services simple. But the pattern defined in this post will work equally well with these architectures.

Techniques

Before we get into the good stuff, it is important to understand why I chose to orchestrate the deployment of these services using an Azure Pipeline.

I could have quite easily built the infrastructure manually straight into the Azure Portal or using some Azure PowerShell automation or the Azure CLI, so why do it this way?

There are a number of reasons that I’ll list below, but this is the most mature way to deploy applications and services.

ss_sonarqube_journey_of_an_Azure_professional

  1. I wanted to define my services using infrastructure as code using an Azure Resource Manager template.
  2. I wanted the infrastructure as code under version control using Azure Repos. I could have easily used GitHub here or one of a number of other Git repositories, but I’m using Azure Repos for simplicity.
  3. I wanted to be able to orchestrate the deployment of the service using a CI/CD pipeline using Azure Pipelines so that the process was secure, repeatable and auditable. I also wanted to parameterize my pipeline so that I could configure the parameters of the service (such as size of the resources and web site name) outside of version control. This would also allow me to scale the services by tweaking the parameters and simply redeploying.
  4. I wanted to use a YAML multi-stage pipeline so that the pipeline definition was stored in version control (a.k.a. pipeline as code). This also enabled me to break the process of deployment into two stages:
    • Build – publish a copy of the Azure Resource Manager templates as an artifact.
    • Deploy to Dev – deploy the resources to Azure using the artifact produced in the build.

Note: I’ve made my version of all these components public, so you can see how everything is built. You can find my Azure DevOps repository here and the Azure Pipeline definition here.

Step 1 – Create a project in Azure DevOps

First up we need to have an Azure DevOps organization. You can sign up for a completely free one that will everything you need by going here and clicking start free. I’m going to assume you have your DevOps organization all set up.

  1. In your browser, log in to your Azure DevOps organization.
  2. Click + Create project to create a new project.
  3. Enter a Project Name and optionally a Description.
  4. Select Public if you want to allow anyone to view your project (they can’t contribute or change it). Otherwise leave it as Private to make it only visible to you.
  5. Click Create.

ss_sonarqube_createproject

You’ve now got an Azure Repo (version control) as well as a place to create Azure Pipelines as well as a whole lot of other tools, such as Azure Boards, that we’re not going to be using for this project.

Step 2 – Add ARM Template Files to the Repo

Next, we need to initialize our repository and then add the Azure Resource Manager (ARM) template files and the Azure Pipeline definition (YAML) file. We’re going to be adding all the files to the repository directly in the browser, but if you’re comfortable using Git, then I’d suggest using that.

  1. Select Repos > Files from the nav bar.
  2. Make sure Add a README is ticked and click Initialize.ss_sonarqube_initializerepo
  3. Click the ellipsis (…) next to the repo name and select Create a new folder.
  4. Set the Folder name to infrastructure. The name matters because the pipeline definition expects to find the ARM template files in that folder.
  5. Enter a checkin comment of “Added infrastructure folder”.
  6. Click Create.ss_sonarqube_createinfrastructurefolder
  7. Once the folder has been created, we need to add two files to it:
    • sonarqube.json – The ARM template representing the infrastructure to deploy.
    • sonarqube.parameters.json – The ARM template default parameters.
  8. Click here to download a copy of the sonarqube.json. You can see the content of this file here.
  9. Click here to download a copy of the sonarqube.parameters.json. You can see the content of this file here.
  10. Click the ellipsis (…) next to the infrastructure folder and select Upload file(s).
  11. Click the Browse button and select the sonarqube.json and sonarqube.parameters.json files you downloaded.
  12. Set the Comment to something like “Added ARM template”.
  13. Ensure Branch name is set to master (it should be if you’re following along).
  14. Click Commit.ss_sonarqube_uploadarmtemplate

We’ve now got the ARM Template in the repository and under version control. So we can track any changes to them.

Note: When we created the infrastructure folder through the Azure DevOps portal a file called _PlaceHolderFile.md was automatically created. This is created because Git doesn’t allow storing empty folders. You can safely delete this file from your repo if you want.

Step 3 – Create your Multi-stage Build Pipeline

Now that we’ve got a repository we can create our mulit-stage build pipeline. This build pipeline will package the infrastructure files and store them and then perform a deployment. The multi-stage build pipeline is defined in a file called azure-pipelines.yml that we’ll put into the root folde of our repository.

  1. Click here to download a copy of the azure-pipelines.yml. You can see the content of this file here.
  2. Click the ellipsis (…) button next to the repository name and select Upload file(s).
  3. Click Browse and select the azure-pipelines.yml file you dowloaded.
  4. Set the Comment to something like “Added Pipeline Defnition”.
  5. Click Commit.ss_sonarqube_uploadpipelinefile
  6. Click Set up build button.
  7. Azure Pipelines will automatically detect the azure-pipelines.yml file in the root of our repository and configure our pipeline.
  8. Click the Run button. The build will fail because we haven’t yet created the service connection called Sonarqube-Azure to allow our pipeline to deploy to Azure. We also still still need to configure the parameters for the pipeline.ss_sonarqube_createbuildpipeline

Note: I’ll break down the contents of the azure-pipelines.yml at the end of this post so you get a feel for how a multi-stage build pipeline can be defined.

Step 4 – Create Service Connection to Azure

For Azure Pipelines to be able to deploy to Azure (or access other external services) it needs a service connection defined. In this step we’ll configure the service sonnection called Sonarqube-Azure that is referred to in the azure-pipelines.yml file. I won’t go into too much detail about what happens when we create a service connection as Azure Pipelines takes care of the details for you, but if you want to know more, read this page.

Important: This step assumes you have permissions to create service connections in the project and permissions to Azure to create a new Serivce Principal account with contributor permissions within the subscription. Many users won’t have this, so you might need to get a user with the enough permissions to the Azure subscription to do this step for you.

  1. Click the Project settings button in your project.
  2. Click Service connections under the Pipelines section.
  3. Click New service connection.
  4. Select Azure Resource Manager.
  5. Make sure Service Principal Authentication is selected.
  6. Enter Sonarqube-Azure for the Connection name. This must be exact, otherwise it won’t match the value in the azure-pipelines.yml file.
  7. Set Scope level to Subscription.
  8. From the Subscription box, select your Azure Subscription.
  9. Make sure the Resource group box is empty.
  10. Click OK.
  11. An authorization box will pop up requesting that you authenticate with the Azure subscription you want to deploy to.
  12. Enter the account details of a user who has permissions to create a Service Principal with contributor access to the subscription selected above.ss_sonarqube_createserviceconnection

You now have a service connection to Azure that any build pipeline (including the one we created earlier) in this project can use to deploy services to Azure.

Note: You can restrict the use of this Service connection by changing the Roles on the Service connection. See this page for more information.

Step 5 – Configure Pipeline Parameters

The ARM template contains a number of parameters which allow us to configure some of the things about the Azure resources we’re going to deploy, such as the Location (data center) to deploy to, the size of the resources and the site name our Sonarqube service will be exposed on.

In the azure-pipelines.yml file we configure the parameters that are passed to the ARM template from pipeline variables. Note: There are additional ARM template parameters that are exposed (such as sqlDatabaseSkuSizeGB and sonarqubeImageVersion), but we’ll leave the configuration of those parameters as a seprate exercise.

The parameters that are exposed as pipeline variables are:

  • siteName – The name of the web site. This will result in the Sonarqube web site being hosted at [siteName].azurewebsites.net.
  • sqlServerAdministratorUsername – The administrator username that will be used to administer this SQL database and for the Sonarqube front end to connct using. Note: for a Production service we should actually create another account for Sonarqube to use.
  • sqlServerAdministratorPassword – The password that will be used by Sonarqube to connect to the database.
  • servicePlanCapacity – The number of App Service plan nodes to use to run this Sonarqube service. Recommend leaving it at 1 unless you’ve got really heavy load.
  • servicePlanPricingTier – This is the App Service plan pricing tier to use for the service. Suggest S1 for testing, but for systems requiring greater performance then S2, S3, P1V2, P2V2 or P3V2.
  • sqlDatabaseSkuName – this is the performance of the SQL Server. There are a number of different performance options here and what you chose will need to depend on your load.
  • location – this is the code for the data center to deploy to. I use WestUS2, but chose whatever datacenter you wish.

The great thing is, you can change these variables at any time and then run your pipeline again and your infrastructure will be changed (scaled up/down/in/out) accordingly – without losing data. Note: You can’t change location or siteName after first deployment however.

To create your variables:

  1. Click Pipelines.
  2. Click the SonarqubeInAzure pipeline.
  3. Click the Edit button.
  4. Click the menu button (vertical ellipsis) and select Variables.
  5. Click the Add button and add the following parameters and values:
    • siteName – The globally unique name for your site. This will deploy the service to [siteName].azurewebsites.net. If this does not result in a globally unique name an error will occur during deployment.
    • sqlServerAdministratorUsername – Set to sonarqube.
    • sqlServerAdministratorPassword – Set to a strong password consisting of at least 8 characters including upper and lower case, numbers and symbols. Make sure you click the lock symbol to let Azure DevOps know this is a password and to treat it accordignly.
    • servicePlanCapacity – Set to 1 for now (you can always change and scale up later).
    • servicePlanPricingTier – Set to S1 for now (you can always change and scale up later).
    • sqlDatabaseSkuName – Set to GP_Gen5_2 for now (you can always change and scale up later). If you want to use the SQL Serverless database, use GP_S_Gen5_1, GP_S_Gen5_2 or GP_S_Gen5_4.
    • location – set to WestUS2 or whatever the code is for your preferred data center.
  6. You can also click the Settable at Queue time box against any of the parameters you want to be able to set when the job is manually queued.ss_sonarqube_createvariablesss_sonarqube_variables
  7. Click the Save and Queue button and select Save.

We are now ready to deploy our service by triggering the pipeline.

Step 6 – Run the Pipeline

The most common way an Azure Pipeline is going to get triggered is by committing a change to the repository the build pipeline is linked to. But in this case we are just going to trigger a manual build:

  1. Click Pipelines.
  2. Click the SonarqubeInAzure pipeline.
  3. Click the Run pipeline.
  4. Set any of the variables we want to change (for example if we wanted to scale up our services).
  5. Click Run.
  6. You can then watch the build and deploy stages complete.ss_sonarqube_runpipeline.gif

Your pipeline should have completed and your resources will be on thier way to being deployed to Azure. You can rerun this pipeline at any time with different variables to scale your services. You could even delete the front end app service completely and use this pipeline to redeploy the service again – saving lots of precious $$$.

Step 7 – Checkout your new Sonarqube Service

You can login to the Azure Portal to see the new resource group and resources that have been deployed.

  1. Open the Azure portal and log in.
  2. You will see a new resource group named [siteName]-rg.
  3. Open the [siteName]-rg.ss_sonarqube_resources
  4. Select the Web App with the name [siteName].ss_sonarqube_webapp
  5. Click the URL.
  6. Your Sonarqube application will open after a few seconds. Note: It may take a little while to load the first time depending on the performance you configured on your SQL database.ss_sonarqube_theapplication
  7. Login to Sonarqube using the username admin and the password admin. You’ll want to change this immediately.

You are now ready to use Sonarqube in your build pipelines.

Step 8 – Scaling your Sonarqube Services

One of the purposes of this process was to enable the resources to be scaled easily and non-desrtructively. All we need to do is:

  1. Click Pipelines.
  2. Click the SonarqubeInAzure pipeline.
  3. Click the Run pipeline.
  4. Set any of the variables we want to change to scale the service up/down/in/out.
  5. Click Run.
  6. You can then watch the build and deploy stages complete.

Of course you could do a lot of the scaling with Azure Automation, which is a better idea in the long term than using your build pipeline to scale the services because you’ll end up with hundreds of deployment records over time.

A Closer look at the Multi-stage Build Pipeline YAML

At the time of writing this post, the Multi-stage Build Pipeline YAML was relatively new and still in a preview state. This means that it is not fully documented. So, I’ll break down the file and highlight the interesting pieces:

Trigger

ss_sonarqube_yamltrigger

This section ensures the pipeline will only be triggered on changes to the master branch.

Stages

ss_sonarqube_yamlstages

This section contains the two stages: Build and Deploy. We could have as many stages as we like. For example: Build, Deploy Test, Deploy Prod.

Build Stage

ss_sonarqube_yamlbuildstage

This defines the steps to run in the build stage. It also requires the execution of the stage on an Azure DevOps agent in the vs2017-win2016 pool.

Build Stage Checkout Step

ss_sonarqube_yamlbuildcheckout

This step causes the repository to be checked out onto the Azure DevOps agent.

Build Stage Publish Artifacts Step

ss_sonarqube_yamlbuildpublish

This step takes the infrastructure folder from the checked out repository and stores it as an artifact that will always be accessible as long as the build record is stored. The artifact will also be made available to the next stage (the Deploy Stage). The purpose of this step is to ensure we have an immutable artifact available that we could always use to redeploy this exact build.

Deploy Stage

ss_sonarqube_yamldeploystage

The deploy stage takes the artifact produced in the build stage and deploys it. It runs on an Azure DevOps agent in the vs2017-win2016 pool.

It also specifies that this is a deployment to an environment called “dev“. This will cause the environment to show up in the environments section under pipelines in Azure DevOps.

ss_sonarqube_environments.png

The strategy and runOnce define that this deployment should only execute once each time the pipeline is triggered.

Deploy Stage Azure Resource Group Deployment Step

ss_sonarqube_yamldeploystep

This deploy step takes the ARM template from the infrastructure artifact and deploys it to the Sonarqube-Azure Service connection. It overrides the parameters (using the overrideParameters) property using build variables (e.g. $(siteName), $(servicePlanCapacity)).

But what about Azure Blueprints?

One final thing to consider: this deployment could be a great use case for implementing with Azure Blueprints. I would strongly suggest taking a look at using your build pipeline to deploy an Azure Blueprint containing the ARM template above.

Thank you very much for reading this and I hope you found it interesting.

Azure Resource Manager Templates Hands-on Lab and #GlobalAzure 2019

Recently I helped organize and present at the 2019 Global Azure Bootcamp in Auckland. The Global Azure Bootcamp is an huge event run by Azure communities throughout the world all on the same day every year. It is an opportunity for anyone with an interest in Azure to come and learn from experts and presenters and share their knowledge. If you’re new to Azure or even if you’re an expert it is well worth your time to attend these free events.

AucklandGAB2019-1

The Global Azure Bootcamp is also an awful lot of fun to be a part of and I got to meet some fantastic people!

We also got to contribute to the Global Azure Bootcamp Science lab, which was a really great way to learn Azure as well as contribute to the goal of finding potential exosolar planets (how cool is that?). A global dashboard was made available where all locations could compare their contributions. The Auckland Team did fantastically well, given the size of Auckland comparatively: We managed to get 8th on the team leaderboard:

AucklandGAB2019-TeamLeaderboard

Hands-On Workshop Material

As part of my session this year, I produced a Hands-on workshop and presentation showing attendees the basics of using Azure Resource Manager templates as well as some of the more advanced topics such as linked/nested templates and security.

The topics covered are:

AucklandGAB2019-ARMTemplatesWorkshop

I’ve made all of this material open and free for the community to use to run your own sessions or modify and improve.

You can find the material in GitHub here:

https://github.com/PlagueHO/Workshop-ARM-Templates

Thanks for reading and hope to see some of you at a future Global Azure Bootcamp!

Allow Integer Parameter to Accept Null in a PowerShell Function

One of the great things about PowerShell being based on .NET is that we get to the huge number of types built into the framework.

A problem I came across today was that I needed to have a function that took a mandatory integer parameter, but that parameter needed to allow Null. In .NET there is a generic type System.Nullable<T> that allows other types to take on a null value.

function Set-AdapterVlan
{
[CmdLetBinding()]
param
(
[Parameter(Mandatory = $true)]
$Adapter,
[Parameter(Mandatory = $true)]
[AllowNull()]
[Nullable[System.Int32]]
$VlanId
)
if ($null -eq $VlanId)
{
$Adapter | Set-VMNetworkAdapterVlan -Untagged
}
else
{
$Adapter | Set-VMNetworkAdapterVlan -VlanId $VlanId -Access
}
}

This allows me to call the function above with the following:

Set-AdapterVlan -Adapter $adapter -Vlan $null

Which will clear the Vlan ID from the virtual network adapter.

The magic is in the parameter definition:

[Parameter(Mandatory = $true)]
[AllowNull()]
[Nullable[System.Int32]]
$VlanId

The [AllowNull()] attribute allows the $VlanId parameter to accept a Null even though it is mandatory, and the [Nullable[System.Int32]] allows $VlanId to be assigned a null value.

This isn’t something I use often, but thought it was worth sharing.

Enable CORS Support in Cosmos DB using PowerShell

Support for Cross-Origin Resource Sharing (CORS) was recently added to Cosmos DB. If you want to enable CORS on an existing Cosmos DB account or create a new Cosmos DB account with CORS enabled it is very easy to do with Azure Resource Manager (ARM) templates or the Azure Portal.

But what if you’re wanting to find out the state of the CORS setting on an account or set it using PowerShell? Well, look no further.

The Cosmos DB PowerShell module (version 3.0.0 and above) supports creating Cosmos DB accounts with CORS enabled as well as updating and removing the CORS headers setting on an existing account. You can also retrieve the CORS setting for an existing Cosmos DB account.

Installing the CosmosDB Module

The first thing you need to do is install the CosmosDB PowerShell module from the PowerShell Gallery by running this in a PowerShell console:

Install-Module -Name CosmosDB -MinimumVersion 3.0.0.0

ss_cosmosdbcors_installmodule

This will also install the Az PowerShell modules Az.Accounts and Az.Resources modules if they are not installed on your machine. The *-CosmosDbAccount functions in the CosmosDB module are dependent on these modules.

Note: The CosmosDB PowerShell module and the Az PowerShell modules are completely cross-platform and support Linux, MacOS and Windows. Running in either Windows PowerShell (Windows) or PowerShell Core (cross-platform) is supported.

Versions of the CosmosDB PowerShell module earlier than 3.0.0.0 use the older AzureRm/AzureRm.NetCore modules and do not support the CORS setting.

Authenticating to Azure with ‘Az’

Before using the CosmosDB PowerShell module accounts functions to work with CORS settings you’ll first need to authenticate to Azure using the Az PowerShell Modules. If you’re planning on automating this process you’ll want to authenticate to Azure using a Service Principal identity.

Side note: if you’re using this module in an Azure DevOps build/release pipeline the Azure PowerShell task will take care of the Service Principal authentication process for you:

ss_cosmosdbcors_azuredevopspowershelltask

But if you’re just doing a little bit of experimentation then you can just use an interactive authentication process.

To use the interactive authentication process just enter into your PowerShell console:

Connect-AzAccount

then follow the instructions.

ss_cosmosdbcors_authenticateaz.png

Create a Cosmos DB Account with CORS enabled

Once you have authenticated to Azure, you can use the New-CosmosDbAccount function to create a new account:

New-CosmosDbAccount `
-Name 'dsrcosmosdbtest' `
-ResourceGroupName 'dsrcosmosdbtest-rgp' `
-Location 'westus' `
-AllowedOrigin 'https://www.fabrikam.com&#39;,'https://www.contoso.com&#39;

ss_cosmosdbcors_newcosmosdbaccountThis will create a new Cosmos DB account with the name dsrcosmosdbtest in the resource group dsrcosmosdbtest-rgp in the West US location and with CORS allowed origins of https://www.fabrikam.com and https://www.contoso.com.

Important: the New-CosmosDbAccount command assumes the resource group that is specified in the ResourceGroup parameter already exists and you have contributor access to it. If the resource group doesn’t exist then you can create it using the New-AzResourceGroup function or some other method.

It will take Azure a few minutes to create the new Cosmos DB account for you.

Side note: But if you want your PowerShell automation or script to be able to get on and do other tasks in the meantime, then add the -AsJob parameter to the New-CosmosDbAccountcall. This will cause the function to immediately return and provide you a Job object that you can use to periodically query the state of the Job. More information on using PowerShell Jobs can be found here.

Be aware, you won’t be able to use the Cosmos DB account until the Job is completed.

If you look in the Azure Portal, you will find the new Cosmos DB account with the CORS allowed origin values set as per your command:

ss_cosmosdbcors_cosmosdbinportalwithcors

Get the CORS Allowed Origins on a Cosmos DB Account

Getting the current CORS Allowed Origins value on an account is easy too. Just run the following PowerShell command:

(Get-CosmosDbAccount `
-Name 'dsrcosmosdbtest' `
-ResourceGroupName 'dsrcosmosdbtest-rgp').Properties.Cors.AllowedOrigins

ss_cosmosdbcors_getcosmosdbcors

This will return a string containing all the CORS Allowed Origins for the Cosmos DB account dsrcosmosdbtest.

You could easily split this string into an array variable by using:

$corsAllowedOrigins = (Get-CosmosDbAccount `
-Name 'dsrcosmosdbtest' `
-ResourceGroupName 'dsrcosmosdbtest-rgp').Properties.Cors.AllowedOrigins -split ','

ss_cosmosdbcors_getcosmosdbcorssplit

Update the CORS Allowed Origins on an existing Cosmos DB Account

To set the CORS Allowed Origins on an existing account use the Set-CosmosDbAccount function:

Set-CosmosDbAccount `
-Name 'dsrcosmosdbtest' `
-ResourceGroupName 'dsrcosmosdbtest-rgp' `
-AllowedOrigin 'http://www.mycompany.com&#39;

ss_cosmosdbcors_setcosmosdbcors

This will take a few minutes to update. So you can use the -AsJob parameter to run this as a Job.

Remove the CORS Allowed Origins from an existing Cosmos DB Account

You can remove the CORS Allowed Origins setting by setting using the Set-CosmosDbAccount function but passing in an empty string to the AllowedOrigin parameter:

Set-CosmosDbAccount `
-Name 'dsrcosmosdbtest' `
-ResourceGroupName 'dsrcosmosdbtest-rgp' `
-AllowedOrigin ''

ss_cosmosdbcors_removecosmosdbcors

This will take a few minutes to update as well. As always, you can use the -AsJob parameter to run this as a Job.


Final Words

Hopefully, you can see it is fairly simple to automate and work with the Cosmos DB CORS Allowed Origins setting using the PowerShell Cosmos DB module.

If you have any issues or queries or would like to contribute to the PowerShell Cosmos DB module, please head over to the GitHub repository.